• Photography
  • Interviews
  • Business
  • Reviews

Tiffinbox

Inspiring Photographers

  • Home
  • About
  • Blog
  • Contact

3 Main Reasons For Using Lighting Diagrams

August 5, 2011 by Olivier Lance

This guest post is by Olivier Lance, who with Pierre-Jean Quilleré launched Sylights in 2009, a wonderful web and mobile application for photographers that helps them document their lighting setups. Olivier, a full time IT engineer from Paris, France, develops MacOS X software for a living. He's also a passionate photographer. Please follow Olivier on Twitter.

Every now and then, when you post a photo to your blog or on a sharing platform, you get the common question: “how did you light it?”

That's a tricky one! How do you go explaining to somebody a full setup of light modifiers, gobos, flash settings, angles, etc.?

The short answer is: lighting diagrams.

Lighting Diagram

Not everyone needs a lighting diagram to understand the lights behind a photography; experienced photographers can usually tell by looking at the shadows’ softness or shapes or at the catch light.

However, I'm not one of them. At least, not yet! So what do lighting diagrams have that can help me? Let's state the obvious first: lighting diagrams show the gear used to light a scene and how many lights were used. They show where the lights were set and how they were directed, relative to the subject.

“Relativity” is an important notion here. I think it's the key when working with lights. What I really see when I look at a lighting diagram is not “where” the main light is, but “how far” it is from the subject. And “how farther” (or closer, larger, etc.) the fill light has to be to do its job just as I see it in the resulting photo.

The same principle applies to flash power. This is a second set of information that's usually provided on or along with lighting diagrams. To correctly reproduce lighting, one has to know how powerful each light was. But it's really “the relationship between the different light levels that is important”, David Hobby tells us in his article Strobe/Ambient balance: A Shorthand Way of Thinking.

See, we're not used to describing amounts of light in an absolute manner. You'd rather say “this room is dark” – referring to what we usually consider a properly lit room – than “wow, it's barely 150 lux in here!”. Both are indicating a light level, but the former is relative whereas the latter is absolute. So a good lighting diagram could just use the main light as a reference and then say “this light is +1/3 of a stop, this other one -1 stop”.

That's why a lighting diagram is such a wonderful document to any photograph. No matter the kind of flash I use and no matter how powerful they are. By using that basic information – relative distances, angles, relative light levels – I can reproduce the lighting over and over again.

That's the main reason I see why photographers should use lighting diagrams: memory. Some photos are easy enough to remember; a lighting diagram will ensure the others are as easily reproducible. Besides the memory perspective, a document as complete as a lighting diagram is also a great way to share your knowledge … but more on that in a minute.

Another very simple reason is that “a picture is worth a thousand words.” If you’re working with one or several assistants, you’d rather be drawing what you have in mind than explaining it at great length several times! This leads me to the second main reason I think photographers should get used to lighting diagrams: teaching. There are so many people learning artificial lighting nowadays: amateur photographers, photography students and pros as well, who want to improve their technique.? To any of them, lighting diagrams are an incredible educational tool! By putting together a photo and its diagram, one can understand the role and effects of each light in a setup. So if you document your photos by using lighting diagrams, you can actually teach other photographers your lighting techniques and help them figure out very easily how you lit your shoots. Diagrams are also a perfect way to keep track of the setups that worked while testing and learning.
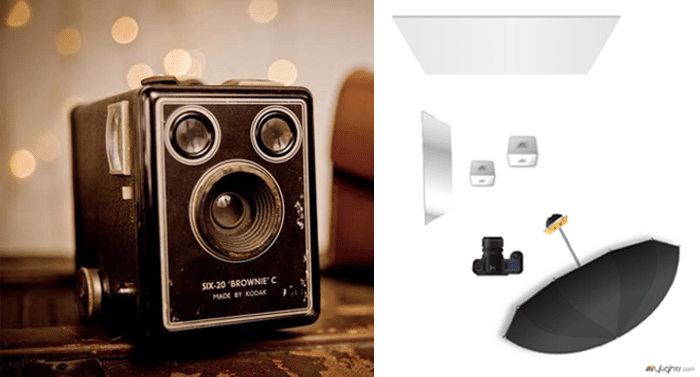
Brownie Camera Lighting Diagram

Finally, lighting diagrams allow any photographer to prepare a shoot beforehand. Just as I’m using a draft paper to prepare this post, a lighting diagram can easily be drawn to throw ideas, get the ball rolling and have some setups ready before a session. This is the third advantage of lighting diagrams: planning. You can of course use any other technique to prepare a shoot, but the completeness of a lighting diagram and its close representation of a real setup makes it a good choice to start with, before you can actually try your setups and make arrangements.

So, why should you use lighting diagrams as a photographer? Because it’s a great way to prepare your sessions, to document your photos afterwards and to keep track of your lighting setups as well as to share them with others and to teach beginners your techniques.

All those reasons pushed me to create Sylights, a service to photographers I launched a year ago with my friend Pierre-Jean Quilleré. Our idea is to make lighting diagrams easy to use and to base a complete sharing platform on them. Sylights’ goal is to accompany every photographers on their learning path and to store their lighting diagrams for them. We already offer a large range of tools for that purpose: an online diagram editor with a lighting diagram gallery accessible to anyone, an iPhone and an iPad app for when you’re on the go. Many features revolve around those three apps.

We’re still evolving and will gladly accept all your feedback to help us answer those three needs: memory, teaching and planning.

We’d also like to know: how do you use lighting diagrams, and why?
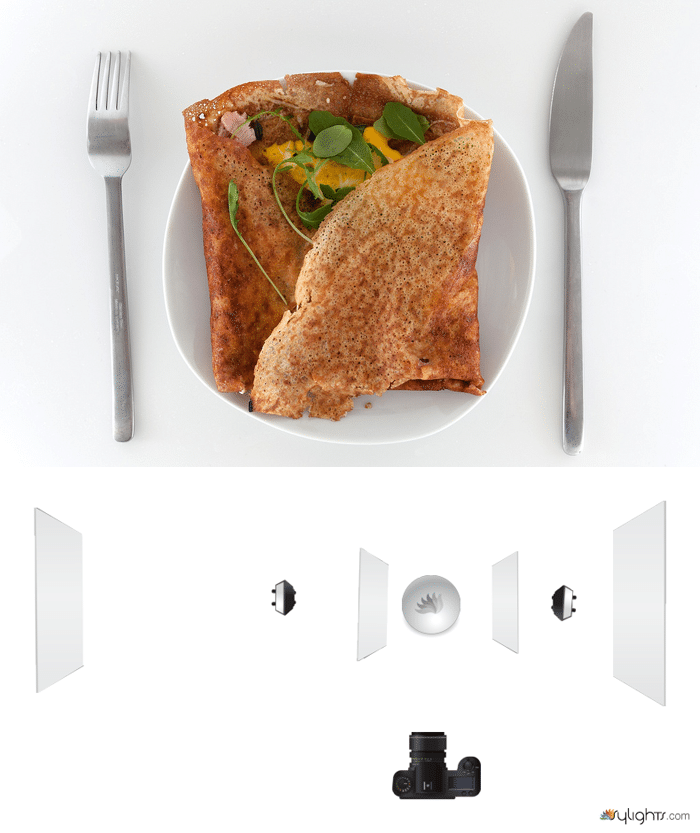
Food Photography Lighting Diagram

Filed Under: Lighting, Photography Tagged With: create light, diagrams, Learning, light diagram, light levels, Lighting, lighting techniques, memory, photographer, Photography, planning, setup, Teaching, used lighting

Portable Power Options For Photographers

July 29, 2011 by Seshu | Editor & Publisher

Yesterday, Tony Urban talked about off-camera lighting on location. If you are photographing early in the morning or later in the day, it's much easier to use your smaller Speedlites for the kind of results Tony produces for his clients.

But when you aren't so lucky about picking the time of day and your stuck having to fight that big fiery ball in the sky called the Sun, you are going to need something more powerful, like a studio strobe. Check out how Justin Van Leeuwen does it with an Elinchrom Quadra System.

I recently bought a few used Elinchrom monoblocs for the expressed purpose of using them outside, in the sun and to over power it. That's all well and good, but I was left wondering about how I would power it in the field.

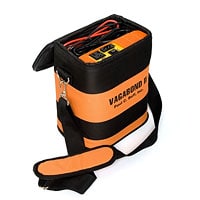
Paul C. Buff's Vagabond IIWell, I initially bought the Paul C. Buff Vagabond II, now being discontinued. It is one very heavy option and I tell you I didn't use it much at all because it was such a pain to lug around. Photographer Blair Phillips has come up with an interesting way to carry it around, so if you have a Vagabond II, you should check the LR-02 Light Rover.

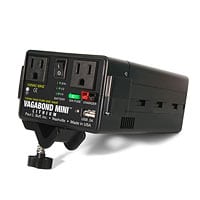
Paul C. Buff's Vagabond MiniI sold my Vagabond II unit and for some time I did not have another option. But the folks at Paul C. Buff came out with the much lighter Vagabond Mini. The wait to get one of those units, when I ordered them, was 2 to 3 weeks. That may not be the case anymore. At $240, it was a no brainer. Plus, Rob Galbraith's review of the Vagabond Mini convinced me that this was the unit to buy for what I wanted to do. Knowing its capabilities, I am not one to expect a faster recycle time than 3 or 3 1/2 seconds at full pop. So, I just shoot accordingly.

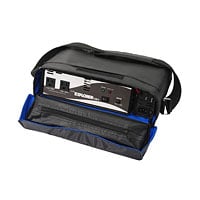
But there are clearly other options out there. Cris Mitchell of ProPhotoResource suggested that I look at Innovatronix Explorer XT as an alternative to the Vagabond II. It too is solidly built and has rave reviews from its legions of fans.

Tronix Explorer MiniToday, I received an email about Tronix Explorer Mini. And here, according to the company, are the top reasons for buying it. Check out the video below that shows you how quickly the unit recycles. While it calls itself a “mini” it is only so relative to its big brother the Tronix Explorer XT3 (coming soon).

I wonder if Rob Galbraith will get his hands on this unit so that he could compare it with the Vagabond Mini. I sure hope so! If you consider yourself handy with tools and gadgets and like to put things together, take a look at this Instructables tutorial to create a portable power box for photographers.

Which option would go for and why? Tell us in the comments. If you found this post useful, please share it with your tribe using the social media icons you see directly below this post. Thank you!

Filed Under: Lighting, Photography Tagged With: photographer, Photographers, portable power, studio strobes, the field, Tronix Explorer Mini, Vagabond Mini

Off-Camera Lighting On Location

July 28, 2011 by Tony Urban

Today's guest blog is by Tony Urban, a photographer based in Western Pennsylvania. Tony specializes in High School Senior Portraiture. Please follow Tony on Twitter.

At least twice a week someone who has just learned that I'm a photographer responds to that information by telling me that their uncle/coworker/neighbor/dog walker/classmate/etc. is a photographer too. So how is a working, professional portrait artist with a legitimate business supposed to compete with all of the new shooters who are, quite often, working for free just because they “really like to take pictures”? There are several options, but one of them is to stop “taking” pictures and to start “making” portraits.

High School Senior In Front Of A Car

High Senior Posing On The Ground

The word photography, as most know, is based on the Greek words “photos” (meaning light) and “graphe” (meaning drawing) – drawing with light. Despite that, many senior photographers ignore lighting when it comes to creating their images and as a result, they produce a style that can easily be reproduced by anyone with a “fancy camera”. With the proliferation of natural light photographers, it's more important then ever to have a stye that will set your work apart.

I'm a full time senior portrait photographer and over the past 2 years I've transitioned from being a “natural light” shooter to a photographer who drags around lights on every senior photo shoot. It doesn't matter if we're hiking into the forest or wading into the lake – if I'm making the portrait, I'm lighting it too. We might be shooting in “God's Studio”, but we're using my light to create the image.

On one hand, my business has almost doubled from the time I changed from natural light to controlling the light.

I've spent way too much money on lighting equipment over the past few years. Small flashes, studio strobes, Pocket Wizards, Radio Poppers, light stands, boom arms, sand bags, power packs, etc. Sometimes I carry my gear, others I use a modified golf cart. I use translucent umbrellas, soft boxes, octoboxes and beauty dishes all outside while shooting on location. Not only does this gear take the portraits to a level that is unattainable by the guy who just bought a D5000 and opened up his business, but it gives my clients more of a “model” experience and makes them more excited about the shoot.

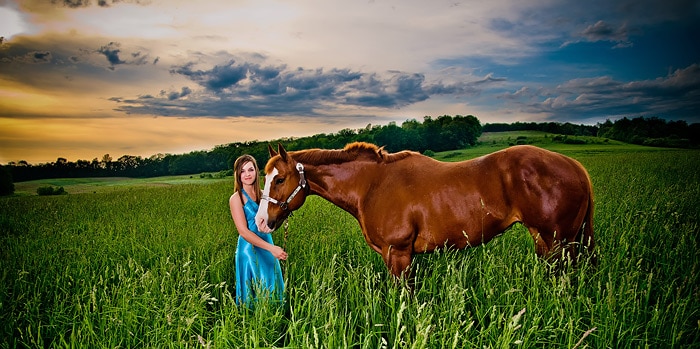
High School Senior In The Meadow With Her Horse

High School Senior Blowing Thistle Seeds

Is lighting a big deal to my senior portrait clients? On one hand, my business has almost doubled from the time I changed from natural light to controlling the light. On the other, not a single client has ever looked at their photos and said, “Wow, that's some beautiful lighting!” To the average client, I suspect good light is appreciated on a subconscious level. It makes them enjoy and appreciate the photos more, even if they aren't sure why.

If you're a professional photographer you really should understand the basics of studio lighting and taking the knowledge and using it outdoors isn't as intimidating as it first appears. Basically, you just have to compensate for the sun/ambient light (a light meter comes in handy with this) and, you have to deal with wind, rain and whatever else Mother Nature decides to toss your way.

The Strobist website is a fantastic resource and you'll find exhaustive amounts of information there about lighting. I haven't even begun to read a fraction of what is discussed there because I usually prefer to learn by doing rather than studying, but it should still be the first stop for any photographer looking to take their lights into the great outdoors.

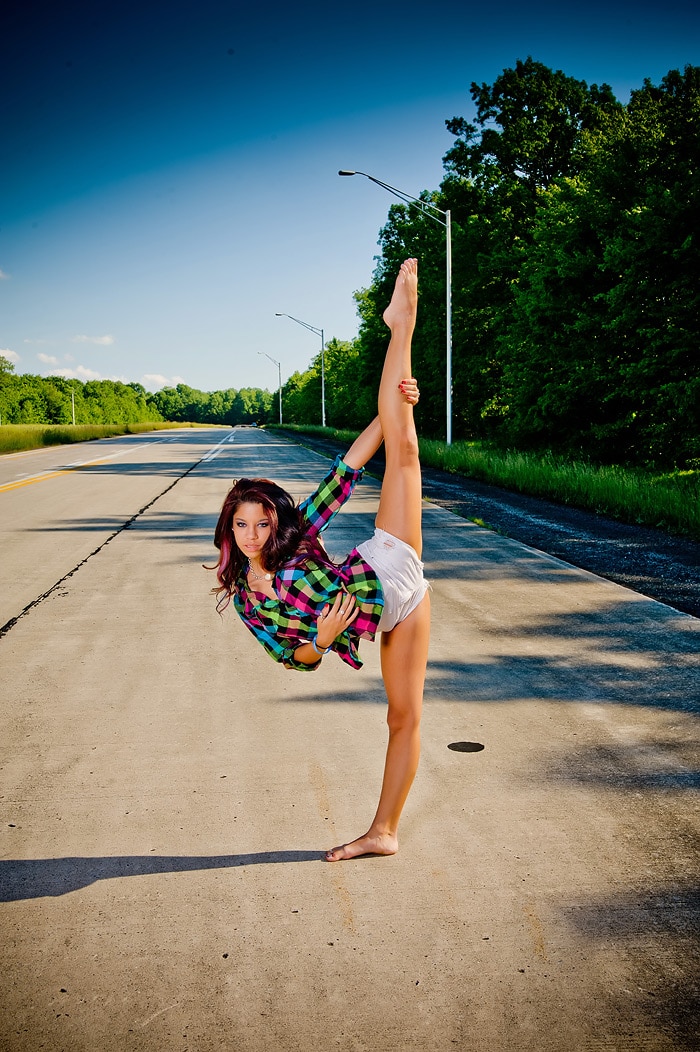
High School Senior Gymnast

High School Senior - Splash The Dress Session

There's no magic bullet when it comes to lighting outside. Sometimes I use Nikon Speedlights and Radio Poppers. Sometimes I use White Lightning strobes and Pocket Wizards. Both have their pros and cons. Speedlights are lightweight and easily portable but might be lacking in power depending on what you want to do with them. Strobes have tons of power but can be bulky and you need to use portable power packs to run the lights.

Maybe even more important than the lights themselves is what you use to sculpt the light. I prefer Beauty Dishes as they typically give you the most “bang for your buck” in terms of power. I always use them with the diffusion sock on though to soft the light produced. I, personally, love soft light and find it flattering for most senior portrait clients. It's important that you don't get too caught up in “lighting” the portrait to remember all of the other technical areas which need to excel – the pose, the composition, the subject's expression, etc. You can create the most stunningly lit photo possible but your client isn't going to buy it if the pose makes them look chubby or if their smile is a little goofy. Portrait photography is about making your client look amazing and the lighting is just one part of that.

The best light you can use is simple – it's the one that gets the job done. Play with your lights, experiment, see what works best for you and your style of photography. Once you've mastered using one light outdoors, move on to 2 lights – or 3 or 4 – or go crazy like Joe McNally and use so many that you lose count. But when you're working with your seniors, remember that your goal is to make them look great. Use your lights to give them unique portraits that all of the weekend warriors wouldn't even try to create. Your lights can be another tool to take your work to the next level and to help your portrait business stand out amongst a rising sea of “shooters”.

Do you agree with Tony that lighting can be the biggest differentiator? Tell us how you distinguish your work from others? And if you enjoyed this post, please “Share The Knowledge” by clicking on one or more of the social media buttons you see below! Thank you.

Filed Under: Lighting, Photography Tagged With: camera lighting, Flash, light meter, Lighting, lighting equipment, location, natural lighting, photographic lighting, Photography, portrait photography, Portraits, senior portrait photographer, senior portraits, soft light, strobe light, studio lighting, tony urban

Photographers, How Do You Stay Creative?

July 18, 2011 by Seshu | Editor & Publisher

A few days ago, I ran out of space on my Dropbox account. It wasn't intentional but I received a pleasant reminder from the service to upgrade. While the service is exceptional (one can access files from any connected computer, iPad or iPhone), it's much too easy to simply throw all kinds of data up to it and then forget about it.

So, I looked at the upgrade options and felt that the 50gb at $99/year would make most sense. Then I wondered what I had “dropped” into that box. Most of the files were old – images I had shared with family or friends and were no longer needed. So, I went on a mission to simply prioritize and delete those large files one by one. Well, believe it or not, by the time I was done, I was back down to using only 1gb of space.

Did I now feel like I needed 50gb of space? Unlikely. So, that's how I saved myself $99.

All of this was inspired by a blog post and video that Musea posted called “29 Ways To Stay Creative.” Check it out.

29 WAYS TO STAY CREATIVE from TO-FU on Vimeo.

One of the ways the video suggests one can stay in the creative zone is to have a clutter free desktop. More easily said than done but when I also read that studies have shown how a cluttered lifestyle can increase blood pressure, I got to really thinking about how I can pare things down around me and in the cloud.

So, the first thing I did was to deal with my Dropbox account. If I had sprung for the $99 upgrade and had 50gb to play with, I would have likely just stuffed that server with more data files. Was my approach creative or just practical? I think a little bit of both.

By the way, if you don't have a free Drobox account already and want one, click here. That 2gb of space may just be all that you need.

How do you stay creative? Do you have a process that you can share with us that works for you? Is exorcising clutter your goal too? Share your comments below. I am attacking my email inbox next.

Filed Under: Photography, Web/Tech Tagged With: cloud storage, clutter, creative, data synchronization, dropbox, file hosting, online backup services, photographer, Photographers, spaces

People Still Read, The Power Of Words

July 4, 2011 by Seshu | Editor & Publisher

A Japanese proverb goes something like this: “One written word is worth a thousand pieces of gold”

Granted this is a thinly veiled commercial for an online content marketing company, but this video is a must-see for all photographers.

a) It's for photographers who don't think blogging is all that useful
b) It's for photographers who have embraced blogging but only post images on their sites and don't express themselves in words as well
c) It's for photographers who spend their time only lurking on social media sites like Facebook and Twitter and don't consistently engage with their audience/target market

Now that you know WHY words can make a difference I bet you are scratching your head about HOW to go about blogging for your photography business.

First, I highly recommend Zach Prez's ebooks – Photography Blog Success AND Photography Web Marketing Guide. These two guides are filled with great information and you can't go wrong. I am plugging them here as affiliate only because I think it is worthy of being promoted because they are so useful.

Still not convinced you should write? Hit this blog post I wrote – Read, To Write. Then go read Juan Mireles' synopsis of Jasmine Star's approach and what makes her so successful.

Other awesome resources for you to consider:

Blog Topics by Chris Brogan and friends – a weekly email that will help you come up with a variety of posts if you start to suffer from writer's block. “For $9.97 a month, you get over 40 topics and tons of writing advice.”

I am a huge fan of Kristen Kalp. Her ebook, “Circus Circus” is like a laser guided missile that will hit its target – writing for your business. It's not just about blogging, though that is covered briefly. If you need help writing even a bio, an about me page, a manifesto about what you bring to your target market that is unique, then you've gotta get it.

I am just getting into this book now – Bird By Bird: Some Instructions on Writing and Life – but it came highly recommended, so I figured I would pass that recommendation along to you as well.

Filed Under: Blogging, Marketing, Photography Tagged With: blogging, blogs, circus circus, evoke, internet, japanese proverbs, moving people, photographer, Photographers, Photography, target market, the power of words, web marketing, world wide web, write words

Quick And Simple Photo Shoots

June 24, 2011 by Dan Watkins

Today's guest blog is by Dan Watkins, a widely-published photographer based in Boston, Massachusetts. He is a frequent contributor to the Improper Bostonian. Follow him on Twitter.

I was recently on-location at a Boston restaurant, photographing some food to accompany a magazine piece, when the manager struck up conversation. He reminded me that, when scheduling the shoot, I had mentioned only needing about twenty or thirty minutes to photograph. He then said he was ‘curious' to see what I would produce in such a short time.

The word curious appears in quotes because the tone in his voice led me to believe he actually meant ‘skeptical'. After talking with him more, it turned out most photographers the restaurant had worked with previously did produce great images, but either took a really long time doing so or used so much lighting equipment and modifiers that it became a serious disruption to the restaurant's customers and staff.

This conversation made me realize that there must be something to the adages ‘keep it simple' and ‘less is more' – even when applied to photography. So how can one keep it quick and simple on shoots?

Plan Ahead

My 20-30 minute estimate was based on the fact that we would only be shooting one or two dishes and that I was going to shoot predominantly with available light (adding just an off-camera speedlite if necessary). Since I knew the dishes would need to be prepped, cooked and plated, I also knew I could use that time to check out the location, look for a few good angles to use as backgrounds, and start setting my camera and flash accordingly. I was confident that a half hour would be more than enough time to get plenty of options for the magazine.

Food Photography By Dan Watkins

Food Photography By Dan Watkins - Cocktail

Minimize Lighting Gear and Utilize Available Light Instead

There are instances where shooting with ambient light rather than relying heavily on additional equipment is okay. Sure it's fun to see what sort of stylized images you can create with a four-light or more setup, but that might be something better suited for personal work instead of a client shoot in a public space. Just because you've grown an arsenal of lighting and modifiers doesn't mean there's anything wrong with leaving them home and going back to basics now and then. Less equipment also means less to go wrong, allowing you to focus more on making great photos!

Know How to Control The Available Light

Using ambient light as a main light source isn't enough if you aren't sure how to make it work for you. Pay attention to the quality, color and direction of the light on location and use it to your advantage. For example: using your aperture to control how warm or cool a space lit with tungsten appears on camera, or angling subjects so windows behind them or to the side provide a nice rim-light to separate them from the background.

Food Photography By Dan Watkins - Salad

Food Photography By Dan Watkins - Main Meal

Trust Yourself

Many photographers are far too critical of themselves. While this mentality might have its advantages while editing down a portfolio, for example, it usually doesn't help while on a shoot. Part of the reason a client hires a professional photographer is for their eye. They trust you have the confidence to portray their subject effectively, and so should you.

Know When You've Got The Shot and Move On

Gut feelings play a part in other aspects of professional photography – from what clients we choose to work with, to negotiating creative fees – so there's no reason to ignore them on a shoot. If it feels like you've got the shot, you probably do. It's easy to feel the pressure to over deliver and keep photographing a subject from every possible angle to ensure the client has many options. Most clients, however, prefer choosing between a few really strong images to narrowing down hundreds of minor variations.

Food Photography By Dan Watkins - Fried Fare

Food Photography By Dan Watkins - Variety

While I hadn't even considered my minimal gear and fast-paced process on similar shoots before this conversation, the simple and quick nature of the session was not lost on the manager. In fact, as soon as I finished he asked about my availability and interest in coming back to photograph for the restaurant.

None of this is to say you should always rush through your shoots. Nor should you leave your strobe kit packed away long enough to gather dust. But knowing when and how to work quickly and simply to bring out a location's most flattering light, as well as having the confidence to know when you've got the shot and wrap things up, are definitely attributes that some clients will notice and appreciate.

Food Photography By Dan Watkins - Entree

Food Photography By Dan Watkins - Cocktail

Filed Under: Photography Tagged With: Boston, boston restaurants, dan watkins, Flash, food photography, improper bostonian, lighting equipment, photo shoots, photographer, photographic lighting, Photography, quick and simple, shooting, simple photos

Is Benign Neglect Killing Your Business?

June 21, 2011 by Phil Hollows

Today's guest blog is by Phil Hollows, the Founder and CEO of FeedBlitz, the email and social media automation service and premium FeedBurner alternative. He’s also the author of “List Building for Bloggers” – the leading book on email marketing and social media for people like us. See how to set up email services on FeedBlitz and follow Phil on Twitter.

Who, you? Neglectful? No, way!

Surely I’m talking about that other guy down the street. You take great care of your clients, your art and your business. Right? What could you possibly be neglecting?

You see, while we’re all busy worrying about blog posts and Facebook and Twitter, you’re probably neglecting your site’s most important asset – its email subscribers.

You’re not alone – tens of thousands of other bloggers, businesses and enthusiasts are making the same mistake right now. Tools, themes and widgets have enabled us all to become accidental email marketers, letting a fabulous resource go to waste.

The good news is, with a little work, you can make a huge difference to how quickly your list grows, how well subscribers engage, and – ultimately – into building your business through repeat sales and referrals.

Why? Because becoming an email subscriber is work. Squiggly letters to sign up. Dual opt in. Because of this work, though, these people are really committed to you. They loved what you say enough to put themselves through this process just so that they can hear from you again – what a compliment!

So don’t neglect them. Here are a few core tips, taken from my book “List Building for Bloggers” (use the code TIFFINBOX at check out for a 40% discount) that you can put into place right now:

1. Put your email subscription form above the fold.
2. Have exactly one email subscription form; choices can confuse.
3. Incentivize visitors with a reason to sign up.
4. Deliver that reward when they do using a custom landing page or autoresponder.
5. Brand your mailings so they stick in readers minds.
6. Subscribe to your own mailings so you get the real subscriber experience.

Once your list is growing and becoming more engaged, it can be used to help reward your most committed readers. A Facebook “like” is an air kiss – casual, with no commitment. An email subscriber’s commitment gets your foot in the door. Give them the same focus and attention they’ve shown you.

You can use that commitment and that trust. For example, as well as having your content emailed to them from your blog you can:

a. Ask for referrals.

b. Offer exclusive promotions and discounts (especially during quiet times of year)

So go on. Step it up! Stop being an accidental email marketer. Take a little care and take advantage of this powerful, universal medium. You won’t regret it!

So, do you have a list of people to whom you write to regularly? What lessons have you learned from your experience? If you don't have a list, would this blog post motivate you to start one? Let us know!

Remember to use “TIFFINBOX” when you check out List Building For Bloggers and get 40% off!

Filed Under: Business, Marketing, Photography Tagged With: audience, blogger, building, e mail, email, email marketing, engagement, feedblitz, feedburner, grow, income, list building, phil, strategies, to build, Twitter, world wide web

Keep A Work Log, Your Life Will Thank You

June 20, 2011 by Jocelyn Mathewes

Today's guest blog post is by Jocelyn Mathewes, a wedding and lifestyle photographer who works in both Boston and Baltimore. Given that it is a Monday and the start to your work-week, I figured her topic was highly appropriate. Follow her on Twitter and read her blog.

It's happened so often now, I've finally taken the time to listen: when folks look over my shoulder and see me taking notes, or have a chance to glance at my work notebook, they all say the same two things: “My, you're organized!” and “I love your handwriting!”

Handwriting and Notes

Yes, it's important to be organized (and there are several wonderful resources you should make use of below), but I'm here to tell you one thing that will be utterly amazing if you don't do it already…

Keep Track of Your Time

Much like the way financial advisers tell you to track every penny so you know where you're spending your money, track every minute of your work so you know where you're spending your time.

When I worked as a graphic designer in-house at a non-profit, I had to keep detailed records of all my activities and projects we worked on. The design department didn't really have a budget on its own; all of our work was funded by other peoples' budgets. When the end of the week came, we had to enter every increment bit of time we spent on a project to keep the engine going. My timesheet was a patchwork quilt of craziness!

This sounds daunting, scary, and annoying as hell, doesn't it? I'm going to tell you why it's SO IMPORTANT that you do this in your own business.

As it turns out, knowing where your time goes is an incredibly valuable thing, because it gives you feedback on how your business functions, and what (and how much) activity it involves.

I'm a mom with small children, and this is my part-time full-passion business. I know many others are in this very situation, or similarly restrictive ones. The moment they step away from the computer or return home from a shoot, they're flooded with the patter of feet, the dishes in the sink, or some party or practice to get to.

Having that restriction is a huge motivator to know where my time is going. Every minute I get to spend on my business is absolutely precious, because there's no guarantee I can make up work later in a day without sacrificing some part of my personal life or leisure. (I mean this literally! Have you seen the cost of childcare lately?)

Tracking your time reveals:

– inefficient processes that need to be refined.
– large chunks of work that could possibly be outsourced.
– repeated tasks that could be batched together for more efficiently.

Tracking your time also:

– shows what percentage of your effort going in to each area of your business.
– lets you estimate future task lengths based on past experience.

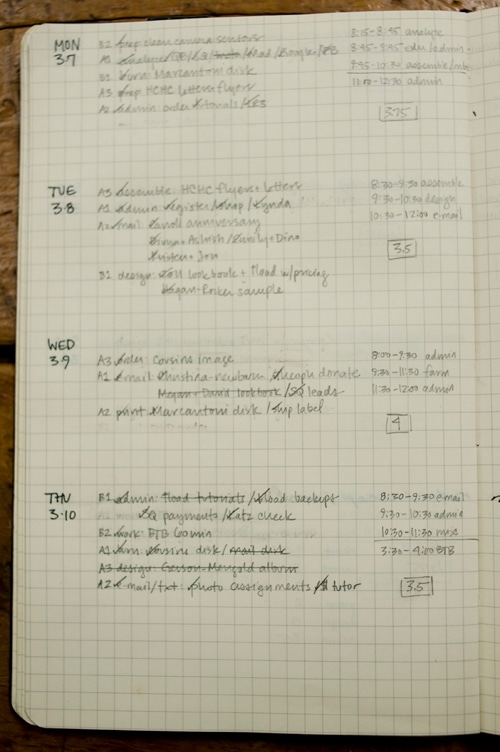
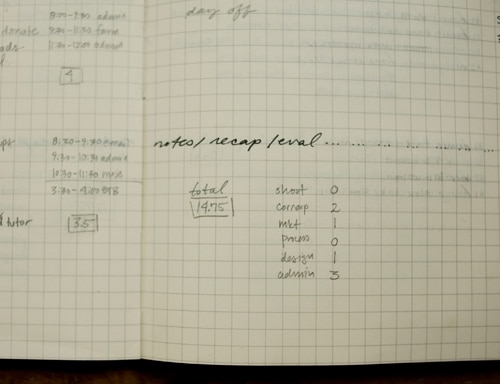
Organized Notebook Closeup

How I Do It

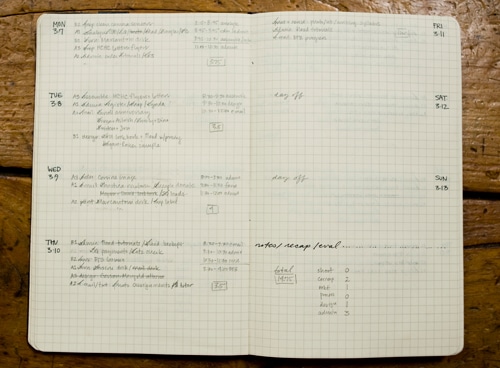
I have a notebook that I keep by my desk. Each spread is a week in my work life. Early in the week I enter in my tasks and prioritize them. As I go day by day, I write down the times I worked on certain projects, and tally the hours. I have set categories of activities that I keep track of in a separate tally.

Work Week Overview

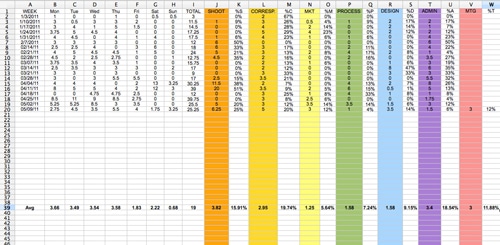
Every so often (and this isn't entirely regular), I take all these numbers and enter them into a simple Excel spreadsheet. The spreadsheet tracks number of hours worked on each of the days of the week, and the number of hours spent in particular categories I've determined are of interest to me. It then tallies the averages and spits out percentages: the heartbeat of my work.

The categories I'm interested in tracking are:

– shooting (time spent behind the camera or on my way to/from a shoot)
– editing (time spent in Lightroom or Photoshop, working on a shoot)
– correspondence (e-mail, phone calls, snail mail, and the like)
– marketing (social media time, designing marketing materials, distributing materials, and blogging)
– meetings (viewing sessions, prospective client meetings, conference calls)
– design (album designs as well as general in-house design work for my branding)
– administrative (filing, Quickbooks and accounting, analyzing my SEO, anything introspective)

Notebook Tally

Looking at all these tasks and percentages and numbers can make a person cross-eyed! But I'll tell you: it sure helps me to understand and the weeks where I worked hard and felt extra pressure, and where that pressure went (was I designing a lot, or was it a heavy shooting week?).

Also, knowing that particular kinds of activities take up a certain amount of time helps me designate days that I devote to that activity. Things that require minimal interruption (like editing and admin tasks) will happen on different days from more interruptive activities (like correspondence or social media tasks).

Worklog In Excel

If you like, feel free to download my little hackneyed spreadsheet and re-purpose it to your liking.

Of course, there are plenty of other electronic-based time tracking resources out there, but I prefer the paper version, because it forces me to take time and examine my priorities in a deliberate way. I also prefer to keep my work tasks and personal tasks in separate physical places, so that when I'm off work, I'm off work (a tough thing to do when running a business out of your home!).

Make it Yours

My system won't work for everyone, of course. The important thing I want you to take away is this: find a way to track your time. Build a system that works for you, and that gives you the insight into your activities that you need! Your life will thank you.

Productivity Resources

Making Ideas Happen
Scott Belsky of Behance.net, writes in an inspiring and clear way about what makes creative people (or teams) productive and effective.

Getting Things Done
David Allen's classic is a must-read for anyone who wants to get a little more task-oriented. Read more about it here.

43 Folders
Merlin Mann has an amazing set of articles available. Be sure to read his treatise on how to set up a “tickler file”.

Moleskine
Beautiful planners and notebooks that are just hecka fun to use.

Freckle
Time-tracking software for the iPhone and internet, also with invoicing capability (seems super useful for graphic designers).

So, tell us … do you track your time like Jocelyn? Do you have another system? What has worked for you and why?

Filed Under: Business, Photography Tagged With: notebooks, organize, own business, Photographers, Photography, profitability, profitable business, resources, spreadsheet, tracking time, work, work log

Go On Hot Dates With Your Website

June 17, 2011 by Seshu | Editor & Publisher

One clear problem I see online is that websites are starting to all look the same. Web designers are no doubt busy working on new designs all the time, but take a quick look at what is available on a site like ThemeForest and you'll see what I mean. I am frankly quite bored with the choices there.

So, “what's the solution wise guy,” you ask. Simple. Distinguish yourself from your competition by creating or having a website designed that speaks to who you are and what your specific needs are.

Here are two examples of what I am talking about – Essential Imagery and Totally Rad Actions. These websites are an extension of their fun and may quirky personalities. They both produce great work but what's that little something that's making you stick around longer? Think about it. Think very hard about it.

So customizing your website is really your only option. But how do you go about doing that? Do you simply slap together elements willy-nilly and hope that it makes visual sense? No way, right? We all have a vision for what we would like to see, but there are very few photographers who are also good at design. I am a huge believer in working with experts who have the experience and street-cred to produce web sites that stand out.

One such person is Sarah J. Bray, a web designer and strategist based in Virginia Beach.

Here's a short interview with her:

She discusses what is required to differentiate yourself online and offers a program called Hot Dates With Your Website that will guide you through making all the right changes to your website.

Your website wants to take you on a hot date. Read its letter to you -- it's really sweet.The “Friday” Sarah refers to in the video is TODAY. If you want in, today is your day to do it. She is closing the program for some obvious reasons – 1) the more intimate the group, more gets done and 2) everyone will be working on about the same things on their websites so people can actually have meaningful conversations about their successes and challenges.

So, click the banner you see right above this line or visit Sarah's site.

Full disclosures – I paid for this program. Because I think the first few “dates” have been useful to me, I am recommending it to you through an affiliate link. You are going to see lots of changes here on Tiffinbox and it will all be wholly due to the hot dates I am having with my website.

If you do sign up for this, please comment below and I'll connect with you through the private Facebook group Sarah has set up for all of us.

Thanks to Kristen Kalp of BrandCamp for introducing me to Sarah.

Filed Under: Photography, Web/Tech Tagged With: bray, create custom website, dating, hot date, hot dates, Hot Dates With Your Website, personality, Photographers, programming, sarah, Sarah J. Bray, strategist, strategy, unique websites, web design, web designers, Website, website designs, your website

Photographers, Does Google Have Your Back?

June 16, 2011 by Seshu | Editor & Publisher

A familiar lament among wedding and portrait photographers goes like this – “I found my images on another photographer's site and they are using them as their own.”

Thievery online isn't anything new. People have been, um, “borrowing” images for a long time. As one person erroneously told me, “If it's on the web, it's public domain.”

Yeah, right.

If you are a professional you'll want to protect your images. I recall Michael Grecco‘s tedious, but necessary workflow where he sends a batch of his images to the US Copyright Office ever time he wraps up a photo shoot. That takes some discipline, no doubt.

Registering your images at the US Copyright Office is the first step. But I have to wonder how many of us actively do it. When ownership of an image online does come into question, we've had TinEye for some time. You may have also used Myows (which claims to provide free online copyright protection).

Now Google wants to get into that sandbox too.

While Google doesn't offer to protect your images, it appears that this new service will help you search for them. So, if you were to have any question about where or how your images are being used, all it would take is popping them into the search engine and finding where it appears online. Given their larger database, I suspect this is going to be an important tool for photographers who are serious about their art.

Now, what else could you do to protect your images? Well, here is something that my friend Mark Higgins told me about. Instead of retaining your original file name, say, “DSC_3456.jpg,” rename it like so – “110616-smith-park-sb-001.jpg”

So, try and give each of your images a unique file name, if you can.

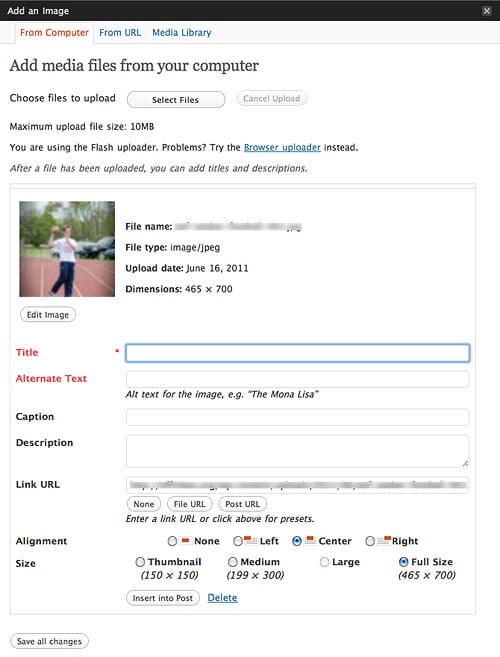
The other thing that might help is to use the “Alternate text” field to fill it in with text describing the image. This is easily done if you have a WordPress blog. As you upload an image, you'll be given a set of fields to fill out if you wish. The Title and Alternate Text fields (red in color in the screengrab below) are the most important as search engines count on these fields to understand and file away or index what it is they are looking at.

WordPress Image Uploader - Title and Alternate Text Fields In Red

If the description of the image matches the content of your blog post, then search engines are more likely to link the two and give it a higher priority.

When it comes time to ascertain whether you are indeed the owner of an image or a clutch of images, there would be no doubt in anyone's mind, based on the information that you have baked into the files before they go online, that you photographed them.

There is more to search engine optimization, of course, so take the time to learn about it from the best. I highly recommend Zach Prez's Web Marketing Guide + Photography Blog Success ebooks. Yes, they are both affiliate links but I promote them only because I have found it very beneficial to me and feel they may be of use to you as well.

So, will Google's new ‘Image Search' option give photographers some peace of mind that their images aren't being used or misused anywhere outside of their control?

To give credit where credit is due, this blog post was inspired by A Photo Editor.

Update: It's nice to see other photographers discuss this new Google service. Read my friend Scott Wyden's review.

Filed Under: Photography, Web/Tech Tagged With: blog, copyright, google, images, internet, internet search engines, misuses, photographer, photography online, search, search engine optimization, tineye, web search engine, world wide web

  • « Previous Page
  • 1
  • …
  • 46
  • 47
  • 48
  • 49
  • 50
  • …
  • 198
  • Next Page »

Subscribe To Tiffibox Treats!

Looking for a well-curated email newsletter that will leave you inspired and motivated about your photography business? Sign up below!

About Seshu

Seshu creates relaxed portraits of families and high school seniors in Avon, Connecticut. He also leads a successful headshot photography studio in Connecticut, helping professionals from a variety of disciplines project the very best versions of themselves. He created Tiffinbox as a way of inspiring photographers, to create better images and successful businesses. [Read More]

Email Templates For Headshot Photographers

Email Templates for Headshot Photographers

Recent Posts

  • How Capture One Changed My Event Photography
  • 10 Steps To Stay Positive In Times Of Great Stress
  • Why You Need To Read “Personal Branding For Photographers” Now
  • How To Master Your Website Content Step By Step?
  • Tony Taafe’s TNT Method For Headshot Photographers

Recent Comments

  • Stephen Davison on Are You A Business Owner Who Is Smart, But Stuck?
  • Ben A. on Don Giannatti Clinches The 8th Annual Tiffinbox Award
  • Dan on Don Giannatti Clinches The 8th Annual Tiffinbox Award
  • Donald Giannatti on Don Giannatti Clinches The 8th Annual Tiffinbox Award
  • Stephen Davison on G.E. Masana’s 6 Strategies For Wedding Photography Success
  • Naveen Kumar on Weddings In India Are More Than Being At The Right Place And At The Right Time
  • kartick on Weddings In India Are More Than Being At The Right Place And At The Right Time
  • Leonid Farbman on 6 Uncommon Trends To Grow Your Photography Business
  • Willow and Finch Wedding Photography on 11 Reception Tips To Help Your Wedding Photography
  • Web Designer Malaysia on How To Optimize Your Squarespace Website For Search Engines
  • Creastan on An Interview With Photojournalist G.M.B. Akash
  • Cindy Brown | Atlanta on An Open Letter To A Local Photographer

Become a Patron!

Copyright © 2026 · Tiffinbox · Site Design by Heather Mackan Creative · Built on Genesis