• Photography
  • Interviews
  • Business
  • Reviews

Tiffinbox

Inspiring Photographers

  • Home
  • About
  • Blog
  • Contact

5 Questions For Strobox

December 29, 2011 by Seshu | Editor & Publisher

Images are created in fractions of a second and our memories are often too poor to remember how we set up a particular shot. Indeed there is a part of us that probably feels confident in achieving the same look and concept, if only we knew where and how the off-camera flashes were placed, how they were modified or what our settings on the camera were. Well, a couple of weeks ago I connected with Janis Lanka, who founded Strobox.

Strobox is a place for all types of photographers to share how they set up that amazing photo! The easiest way to learn is to look at photos and their lighting diagrams so you can see for yourself how they were created.

Here is a, um, snapshot of the questions I peppered Janis with during our conversation. If you have other questions for him, please post them in the comments section below.

1) It's great that in such a short span of time, you have been able to create a community of photographers interested in presenting their work and getting it critiqued. How do you, however, qualify the images? Is it a free for all – anyone can post to the site regardless of quality?

While currently there are few basic rules that I screen each photo for, we are continuously adding measures that help us filter through spam or unqualified photos. It's important to note that Strobox is about a community that raises everyone’s awareness about photography lighting, and as a such, the quality control should be a part of community effort. The ultimate goal is that work displayed is a result of a joint effort from our community rather than just from one or two individuals who happen to have access to MySQL db!
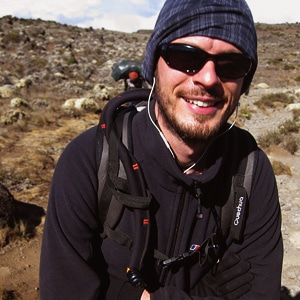
Janis Lanks | Strobox.com2) Tell us a little bit about yourself – are you a professional photographer? Why or rather how did you see the need to create a website like Strobox for photographers?

Just like most who reads this, photography has been a hobby of mine taught to me by my dad with a Zenit camera. Fast forward almost two decades, my learning curve needed some improvement and I purchased a book about portrait photography which explained how each photo was made by giving technical information as well as sketches of lighting diagrams. That is when I asked the question on why such a thing is not available online. The idea was born and it took another 2 years to make it happen. An iPhone app, a community site, and a book later I still see it as a fun experiment.

Currently my day job consists of being a Strategy Consultant at digital agency “Blast Radius” and by evening I'm trying to coordinate a group effort to make Strobox happen – someone from Canada contributes their design skills, from Slovakia their CSS skills, from Lithuania their programming skills, and from England their editor skills, etc. The Strobox core team members are volunteers and not necessarily professional photographers. We continuously need more help (PHP anyone?) so if you want to join us, let me know!

Strobox 2010 Book3) I received Strobox 2010, your first book which is more of a compilation of some of the best work your site has seen in 2010. Books aren't typically huge money makers for their authors. So why take that risk?

No, making a book has not been our revenue strategy. First and foremost it's a celebration of our community and their efforts to help each other raise awareness about photography lighting. While this was yet another one of those enthusiastic experiments which resulted in hundreds of hours spent trying to figure out different legal and logistical things in the book-publishing world, it was totally worth it! Not financially, but the emotional reward is there when you hold that book in your hands for the first time. This book seeks to showcase our community’s achievements during 2010, acknowledge our top contributors, and most importantly, attempting to help us financially sustain our online community. On top of that, we’re also sharing 40% of the book’s profit with the top ten photographers who joined us for this initiative. This has been our first attempt at publishing, and we hope that we'll be able to do this every year and show our appreciation to our community this way.

4) Technique and using tools is one thing. Being able to craft images by collaborating with your subjects is another story. Do you think your site will ever shift the focus every so slightly to discuss that collaboration? That almost intrigues me more than what kind of a light modifier was used in the process of creating an image. Am I in the minority on this?

You are probably in the right minority by asking this excellent question! I would say that story and emotional response it creates is what makes a photo stand out from the others. Lighting technique is merely a tool to help you with that goal. I love listening to other photographers share their techniques and stories of collaboration – those things can't be methodologically systematized as lighting diagrams can. So, in a rather simple way the Strobox community is trying to do one of those “un-sexy” things and geek-out about photography lighting to help each other get the basics right so that sites like yours could take them to the next level.

5) I suspect with sites like 500px.com and Sylights.com, competition keeps you in check. What would you say Strobox does differently and better than those other sites?

Both of your mentioned sites do an amazing job and each of them excel at different things. Without getting in too many details, focus of Strobox should be changing a bit so stay tuned! Additionally, because this is mostly a volunteer experiment that is not based on generating revenue or trying to entice customers, I would rather ask a question of what keeps us doing this. It's our community members who write us and thank us for a useful iPhone app, it’s our Facebook fans who encourage us and like to hear what we’re doing, and it’s our community members who help us with moderation.This started as an attempt to get educated about photography lighting by looking at other examples. But it has turned into a platform for learning. When you learn something, we’ve done well.

Thank you for help us not just create lighting diagrams but also curate them and share them with others. We'll be sure to follow you on Twitter to hear more of your experiments and new features on Strobox.
Filed Under: Lighting, Photography Tagged With: camera, diagrams, janis, lanka, light diagram, Lighting, photographer, Photography, photography lights, portrait photography, professional photographers, questions

The Sylights Interviews: 1 of 4 | Michael Guarisco: Using Lighting Diagrams

December 19, 2011 by Olivier Lance

Olivier Lance of Sylights last wrote a guest blog post here back in August about why one should use lighting diagrams. He is back with a short series of quick interviews with photographers. Here is the first one, with Michael Guarisco, an amateur photographer living in Nancy, France. He shares his knowledge and tutorials here (in French).

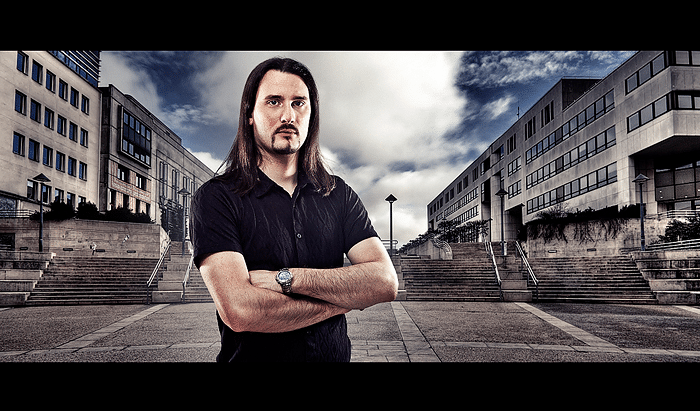
Michael Guarisco | French Photographer

Sylights: This picture is a composite image of at least two photos: one of the model and one for the background. Why did you choose this technique?

Michael Guarisco: This compositing technique is similar to the one used by Joel Grimes, an American photographer. He used it in some ads for Nike, for instance. I'm a fan of this style he achieved, so I wanted to try it myself. I love this work in different phases, it brings in several constraints: on lighting, on the choice of the background, and a heavy post-processing. I wouldn't make it my specialty but it's really instructive!

S: What is your workflow for that kind of compositing?

MG: I take a picture of my subject in a studio on a seamless background (black or white, depending on the subject's clothes, as I need a good contrast) to facilitate his extraction. The point being to find an effective lighting with three light sources, with the right modifiers, etc. … I know Joel Grimes uses large softboxes or beauty dishes. As an amateur, I'm happy with some simple umbrellas! After having processed and extracted my subject, I set off to find my background according the subject's attitude and style. It can take a lot of time, one needs to move and search a lot to find the background that will fit both the processing and the subject. When I've found my background, I take 5 photos with different exposures to perform an exposure fusion. Then I retouch the image a bit to get a satisfying result. If the subject's extraction has been done properly, the final compositing is done easily.

S: How do you make sure that the lights on your subject match those of the background? Do you have any special tips to achieve this?

MG: It's true that it's difficult to have matching lights between the background and the subject. You must simulate light coming from behind the subject to make it look real. Though I don't necessarily look for a perfect, logical lighting, I do make sure that my resulting picture as a whole looks coherent (prevailing color, temperature, etc.). I work a lot with the curves tool; I use it on my subject so that it integrates well into the background, then I use another curves layer on the complete image (I have a fondness for a slight cross-processed look). I completely assume using compositing and I think it's normal that anybody might see my picture is composited, but it's important not to neglect the image's fluidity. I want to hear people saying, “Yes, it's composited, but it works well!”

Michael Guarisco Lighting Diagram

S: What's the place of lighting diagrams in your work? Do you use them as a preparation tool or rather as a documentation tool?

MG: Lighting diagrams are certainly the most important aspect of working with flashes! First of all, they allow one to quickly learn what setups lead to different types of images. It's a very educational tool! Then, even when you're more experienced, it's still useful to plan a session by sketching a bunch of setups we'd like to use. I've always worked with lighting diagrams, I use them for myself as well as for showing others how I've created a photo, on my website. Even in the middle of a chat, a diagram scribbled in the corner of a napkin makes oral explanations way easier! In that sense, Sylights lets anyone archive flash photographs; the sharing aspect pops out, as anybody can understand how each posted image has been created. Moreover, when we work with many different setups it's pleasant to be able to find them back easily on the website!

Filed Under: Interviews, Photography Tagged With: amateur photographer, compositing, diagrams, Joel Grimes, light diagram, Lighting, michael guarisco, olivier lance, photo shoots, photographer, visual effects

3 Main Reasons For Using Lighting Diagrams

August 5, 2011 by Olivier Lance

This guest post is by Olivier Lance, who with Pierre-Jean Quilleré launched Sylights in 2009, a wonderful web and mobile application for photographers that helps them document their lighting setups. Olivier, a full time IT engineer from Paris, France, develops MacOS X software for a living. He's also a passionate photographer. Please follow Olivier on Twitter.

Every now and then, when you post a photo to your blog or on a sharing platform, you get the common question: “how did you light it?”

That's a tricky one! How do you go explaining to somebody a full setup of light modifiers, gobos, flash settings, angles, etc.?

The short answer is: lighting diagrams.

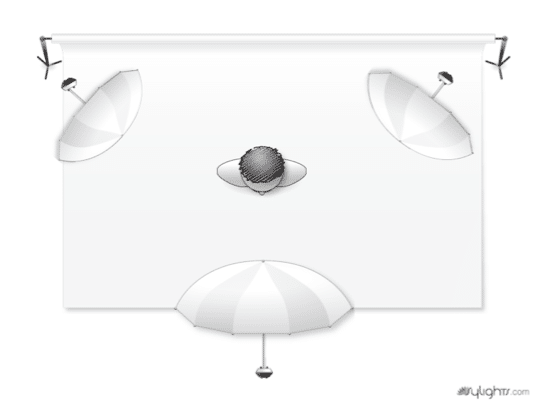
Lighting Diagram

Not everyone needs a lighting diagram to understand the lights behind a photography; experienced photographers can usually tell by looking at the shadows’ softness or shapes or at the catch light.

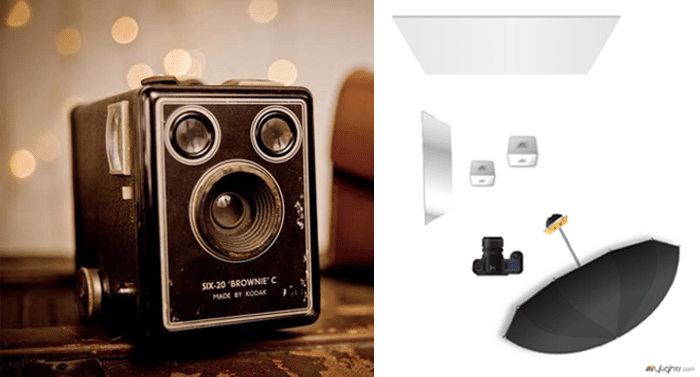
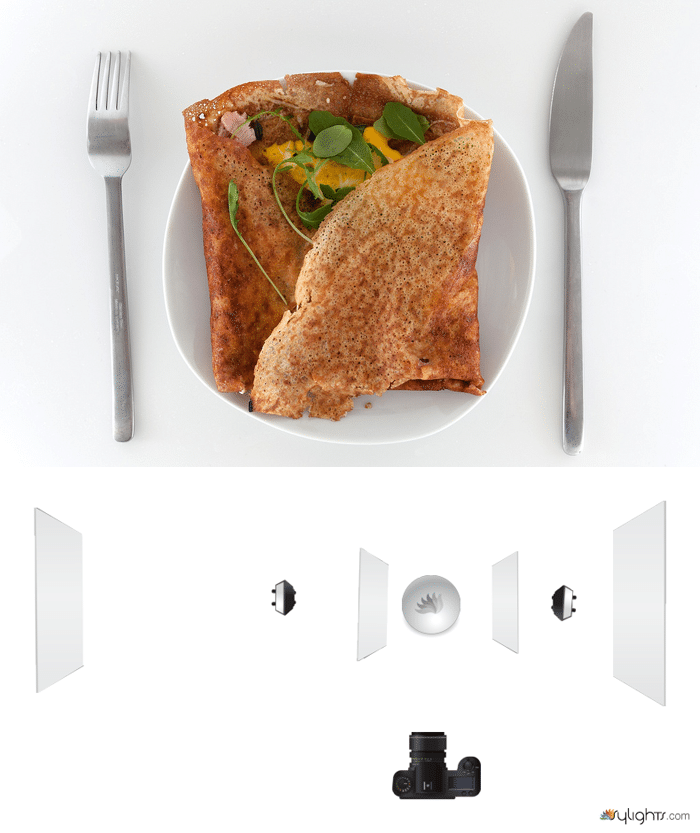
However, I'm not one of them. At least, not yet! So what do lighting diagrams have that can help me? Let's state the obvious first: lighting diagrams show the gear used to light a scene and how many lights were used. They show where the lights were set and how they were directed, relative to the subject.

“Relativity” is an important notion here. I think it's the key when working with lights. What I really see when I look at a lighting diagram is not “where” the main light is, but “how far” it is from the subject. And “how farther” (or closer, larger, etc.) the fill light has to be to do its job just as I see it in the resulting photo.

The same principle applies to flash power. This is a second set of information that's usually provided on or along with lighting diagrams. To correctly reproduce lighting, one has to know how powerful each light was. But it's really “the relationship between the different light levels that is important”, David Hobby tells us in his article Strobe/Ambient balance: A Shorthand Way of Thinking.

See, we're not used to describing amounts of light in an absolute manner. You'd rather say “this room is dark” – referring to what we usually consider a properly lit room – than “wow, it's barely 150 lux in here!”. Both are indicating a light level, but the former is relative whereas the latter is absolute. So a good lighting diagram could just use the main light as a reference and then say “this light is +1/3 of a stop, this other one -1 stop”.

That's why a lighting diagram is such a wonderful document to any photograph. No matter the kind of flash I use and no matter how powerful they are. By using that basic information – relative distances, angles, relative light levels – I can reproduce the lighting over and over again.

That's the main reason I see why photographers should use lighting diagrams: memory. Some photos are easy enough to remember; a lighting diagram will ensure the others are as easily reproducible. Besides the memory perspective, a document as complete as a lighting diagram is also a great way to share your knowledge … but more on that in a minute.

Another very simple reason is that “a picture is worth a thousand words.” If you’re working with one or several assistants, you’d rather be drawing what you have in mind than explaining it at great length several times! This leads me to the second main reason I think photographers should get used to lighting diagrams: teaching. There are so many people learning artificial lighting nowadays: amateur photographers, photography students and pros as well, who want to improve their technique.? To any of them, lighting diagrams are an incredible educational tool! By putting together a photo and its diagram, one can understand the role and effects of each light in a setup. So if you document your photos by using lighting diagrams, you can actually teach other photographers your lighting techniques and help them figure out very easily how you lit your shoots. Diagrams are also a perfect way to keep track of the setups that worked while testing and learning.

Brownie Camera Lighting Diagram

Finally, lighting diagrams allow any photographer to prepare a shoot beforehand. Just as I’m using a draft paper to prepare this post, a lighting diagram can easily be drawn to throw ideas, get the ball rolling and have some setups ready before a session. This is the third advantage of lighting diagrams: planning. You can of course use any other technique to prepare a shoot, but the completeness of a lighting diagram and its close representation of a real setup makes it a good choice to start with, before you can actually try your setups and make arrangements.

So, why should you use lighting diagrams as a photographer? Because it’s a great way to prepare your sessions, to document your photos afterwards and to keep track of your lighting setups as well as to share them with others and to teach beginners your techniques.

All those reasons pushed me to create Sylights, a service to photographers I launched a year ago with my friend Pierre-Jean Quilleré. Our idea is to make lighting diagrams easy to use and to base a complete sharing platform on them. Sylights’ goal is to accompany every photographers on their learning path and to store their lighting diagrams for them. We already offer a large range of tools for that purpose: an online diagram editor with a lighting diagram gallery accessible to anyone, an iPhone and an iPad app for when you’re on the go. Many features revolve around those three apps.

We’re still evolving and will gladly accept all your feedback to help us answer those three needs: memory, teaching and planning.

We’d also like to know: how do you use lighting diagrams, and why?

Food Photography Lighting Diagram

Filed Under: Lighting, Photography Tagged With: create light, diagrams, Learning, light diagram, light levels, Lighting, lighting techniques, memory, photographer, Photography, planning, setup, Teaching, used lighting

Subscribe To Tiffibox Treats!

Looking for a well-curated email newsletter that will leave you inspired and motivated about your photography business? Sign up below!

About Seshu

Seshu creates relaxed portraits of families and high school seniors in Avon, Connecticut. He also leads a successful headshot photography studio in Connecticut, helping professionals from a variety of disciplines project the very best versions of themselves. He created Tiffinbox as a way of inspiring photographers, to create better images and successful businesses. [Read More]

Email Templates For Headshot Photographers

Email Templates for Headshot Photographers

Recent Posts

  • How Capture One Changed My Event Photography
  • 10 Steps To Stay Positive In Times Of Great Stress
  • Why You Need To Read “Personal Branding For Photographers” Now
  • How To Master Your Website Content Step By Step?
  • Tony Taafe’s TNT Method For Headshot Photographers

Recent Comments

  • Stephen Davison on Are You A Business Owner Who Is Smart, But Stuck?
  • Ben A. on Don Giannatti Clinches The 8th Annual Tiffinbox Award
  • Dan on Don Giannatti Clinches The 8th Annual Tiffinbox Award
  • Donald Giannatti on Don Giannatti Clinches The 8th Annual Tiffinbox Award
  • Stephen Davison on G.E. Masana’s 6 Strategies For Wedding Photography Success
  • Naveen Kumar on Weddings In India Are More Than Being At The Right Place And At The Right Time
  • kartick on Weddings In India Are More Than Being At The Right Place And At The Right Time
  • Leonid Farbman on 6 Uncommon Trends To Grow Your Photography Business
  • Willow and Finch Wedding Photography on 11 Reception Tips To Help Your Wedding Photography
  • Web Designer Malaysia on How To Optimize Your Squarespace Website For Search Engines
  • Creastan on An Interview With Photojournalist G.M.B. Akash
  • Cindy Brown | Atlanta on An Open Letter To A Local Photographer

Become a Patron!

Copyright © 2026 · Tiffinbox · Site Design by Heather Mackan Creative · Built on Genesis