• Photography
  • Interviews
  • Business
  • Reviews

Tiffinbox

Inspiring Photographers

  • Home
  • About
  • Blog
  • Contact

Post-processing Digital Images With Visual Supply Company’s Presets For LR & ACR

November 27, 2011 by Seshu | Editor & Publisher

As a portrait and wedding photographer, it's awfully tempting to jump on the latest shining thing that comes along that claims to cut post-processing time down by a significant margin.

After all, what would you rather do, have the time to photograph or sit there in front of your machine for hours processing images? No one I know has opted to do the latter. It just wouldn't make sense to them. So, the search for that holy grail continues.

MY POST-PROCESSING WORKFLOW

My process after an event, be it a portrait session or a wedding, is to download my images off of my CF cards (for the curious, I use Sandisk 8gb Extreme III's). I cull my images in PhotoMechanic, as it allows me to quickly view my raw files and then I mark the ones I want to keep. The ones I edit out are moved into a different folder and out of sight. I then edit images in either Lightroom or Photoshop, depending on how many images there are in the “process” folder. Choices, choices. In the past, I would chug through a wedding with more 1500 images to edit. Lately, I have been thinking of sending them out to Colorati and having them tweak the images for me.

PRESETS FOR AND BY PHOTOGRAPHERS

Visual Supply Company PresetsThere is however one other option. Yes, that bright and shiny thing I mentioned earlier on. It's called Visual Supply Company, or VSCO. If you use Nikon or Canon cameras and you shoot RAW files, your ears should perk up about now. Once you've imported your raw files into Lightroom or Photoshop's Adobe Camera Raw, you are able to apply presets based on your camera's profiles. So Nikon users would use Nikon presets and Canon users would use Canon presets. A select number of Nikon and Canon cameras were used to test these presets to create custom profiles. From what I have been told, the company will continue to add more profiles as they are tested and as newer cameras come into the market. I personally like this progressive aspect of the company a lot. Here is the current list of cameras that have been profiled so far.

FIRST STEPS

From my experience with the presets (which I bought), I needed to have correctly exposed and white balanced images before beginning to work with the presets. So, that should be your first step (getting the exposure right in the camera) and then batch correcting the white-balance, if you have that option after you get home.

EMULATE THE LOOK OF FILM

I don't know about you, but I started out in photography using film. I have shot untold number of rolls of Kodak Tri-X and T-Max 3200. I miss the rich, textures that digital files have all but obliterated. Yes, in the words of Jonathan Canlas or Kirk Mastin (both awesome film-only photographers), I could pick up a film camera again instead of making a digital file look like film. They have a point. Yes, I could do that. But VSCO gives me the opportunity to emulate the look of film without the added expense of working in that wonderful medium. For me, it's really the best of both worlds.

BLACK & WHITE EXAMPLE

>Straight Out Of Camera, or SOOC
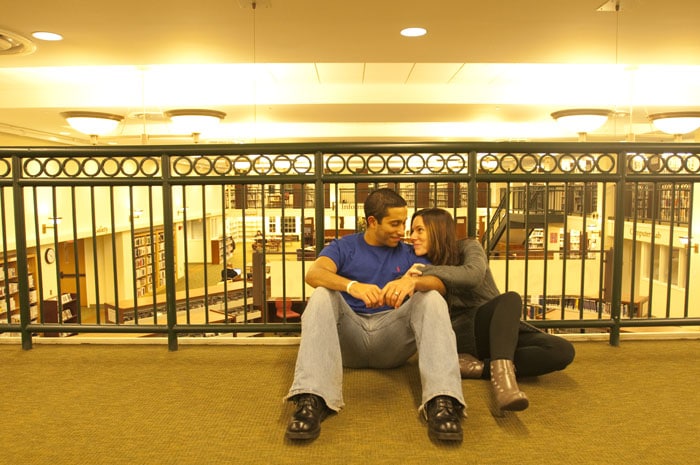
Couple In West Hartford Library - VSCO | Straight Out Of Camera Image

>First Tweak – Just Clicked on the TriX-400++ Preset
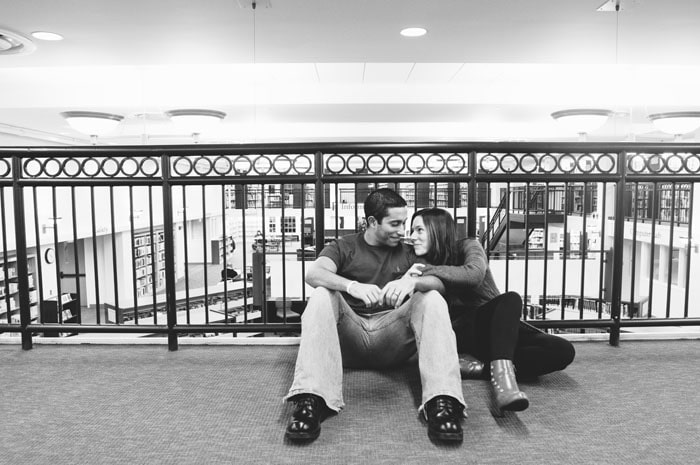
West Hartford Portrait Session | Visual Supply Company TriX-400++ Preset

>Second Tweak – Used the Vignette++ Preset
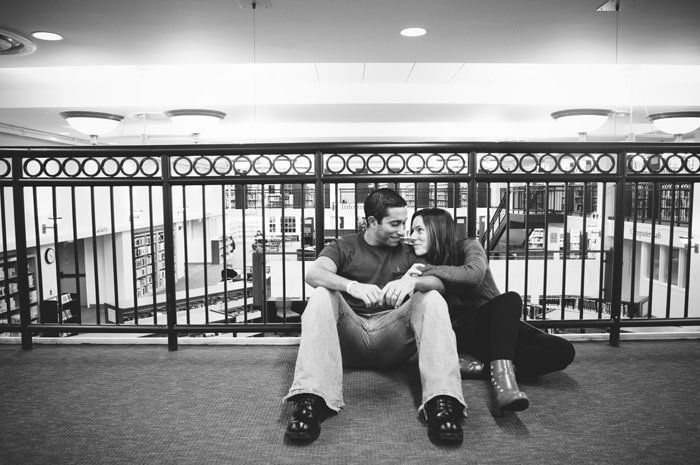
West Hartford Library Portrait Session | Visual Supply Company Vignette++ Preset

>Third Tweak – Used the Dark Skies+ Preset (notice how the t-shirt in this is darker?)
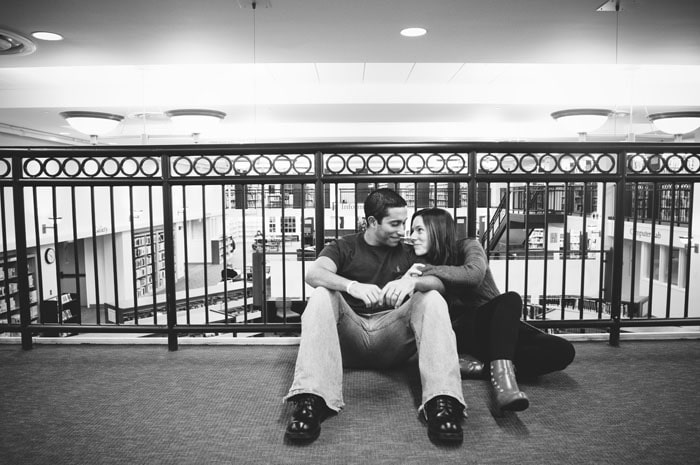
West Hartford Couple Portrait Session | Visual Supply Company Dark Skies+ Preset

So, in three clicks, I arrived at what I consider to be an acceptable final image, ready to be shared with my clients. The images will definitely go through another round of tweaks, in Photoshop if the clients were to order this image.

COLOR EXAMPLE

>Straight Out Of Camera, or SOOC
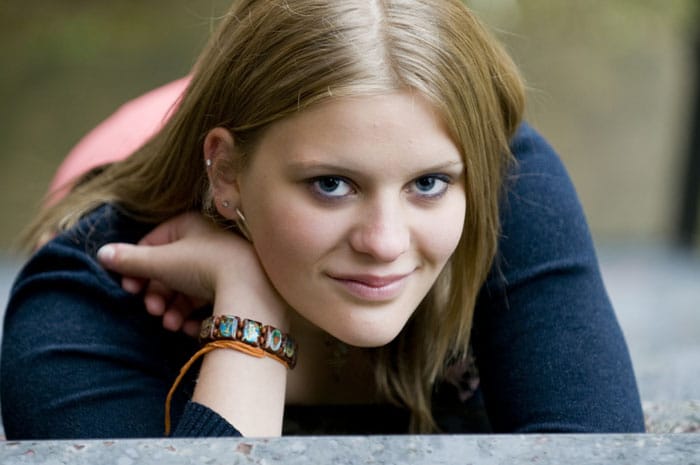
Senior Portrait Session In Canton, Connecticut | Straight Out Of Camera

>First Tweak – Clicked on the Kodak Portra and Contrast++ presets
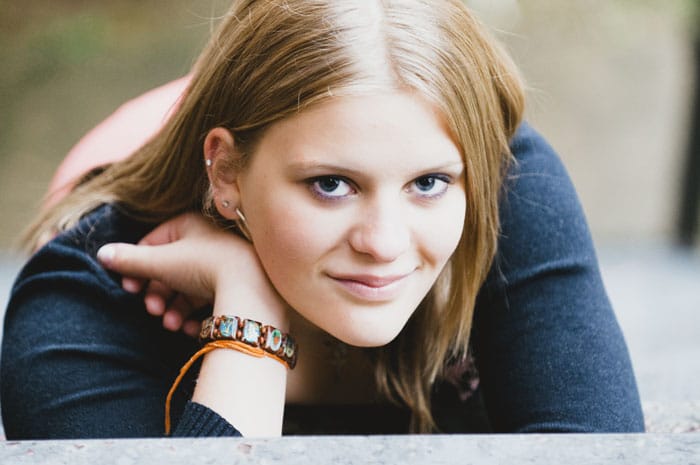
Portrait Session In Canton, Connecticut | Visual Supply Company Kodak Portra & Contrast++ Presets

>Second Tweak – With the above image being a little “hot” in the highlights, I used the “recovery” slider to bring back some highlight detail.
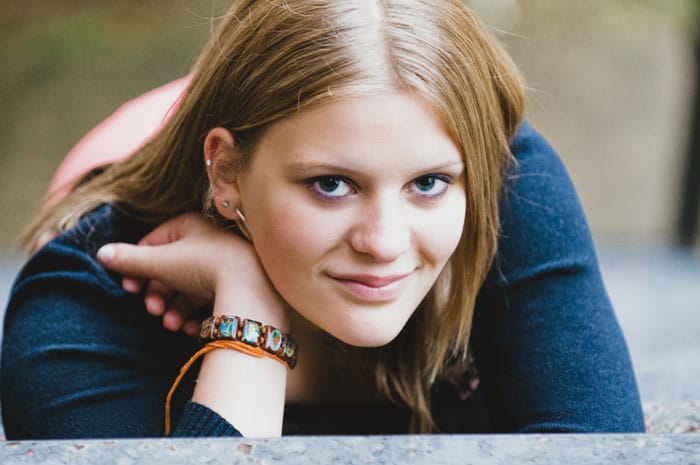
High School Senior Portrait Session In Canton, Connecticut | Visual Supply Company Recovery Slider

>The Final Image – Took this image into Photoshop and used brushes to smoothen out natural blemishes, bring some light back into the eyes and sharpen the image up.
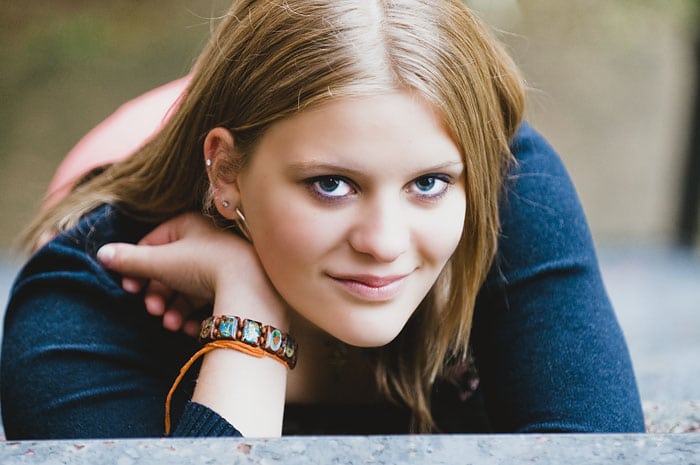
Final Image From Senior Portrait Session In Canton, Connecticut | Tweaking Images In Photoshop

For both sets of images, I used the Visual Supply Company Studio Version. I also processed the images in ACR. With the processing engines the same in both ACR and LR, sometimes it is more convenient to fire up ACR (for a small set of images) versus Lightroom (which I use for image sets that are 100 or more). Wanting to emulate the film look, I was more enamored by the way VSCO's Film helped me produce black and white images. In fact, I might use this almost exclusively to create black & white prints for my clients.

IS THIS FOR EVERYONE?

In one quick answer, no. It's not. I would recommend you look at your needs first. Figure out whether your clients (if you are a professional) would not just see but also appreciate the look you will be producing for them. If you are an amateur or hobbyist, just looking to create images with a different look, these presets will help you achieve that. Let me put to you even more simply – if you are inclined to produce images that you want people to merely look at, then you should pass on this. However, if you are the type of photographer who wants your viewers to dip into a well of emotion and feel the image, then you should definitely buy these now.

THE SWEET DEAL THAT ENDS ON NOVEMBER 29th!

Until Monday night (that's tomorrow night), you can get the Standard, Pro and Studio versions for quite a bit off of their regular prices. I bought the Studio version as it includes both the Lightroom and ACR options for both Nikon and Canon cameras. In the event I work with a photographer who shoots with a Canon system, I can now very easily tweak her/his images as well. If your business is primarily shooting portraits, I would nudge you more towards the Pro version.

From Visual Supply Company's Twitter feed:

“All prices will increase after Monday at midnight PST #VSCOFILM. Standard $59 will be $79, Pro $99 will be $119 & Studio $179 will be $199.”

STILL NOT CONVINCED?

You should also read John Keatley's review of Visual Supply Company's Presets. And Jonas Peterson's review too. Just look at the images they have on display.

SHARE YOUR IMAGES

If you bought the Visual Supply Company presets, please share your images with me and tell me in the comments sections below which presets you liked the most. Do you use other
Disclosure of Material Connection

Filed Under: Photography Workflow Tagged With: acr, adobe photoshop, adobe photoshop lightroom, canon camera, computer graphics, digital negative, digital photography, Film, film cameras, film emulation, graphics file formats, graphics software, lightroom, nikon, Photographers, preset, process imaging, raster graphics editors, raw image format, visual, visual supply company

Keep It Simple Photo Workflow

August 15, 2011 by Seshu | Editor & Publisher

I've described my photography workflow before. At its core is the belief that by keeping things simple, my workflow will cut short the time I spend in front of the computer and allow me to return to making images or spending more time with my family.

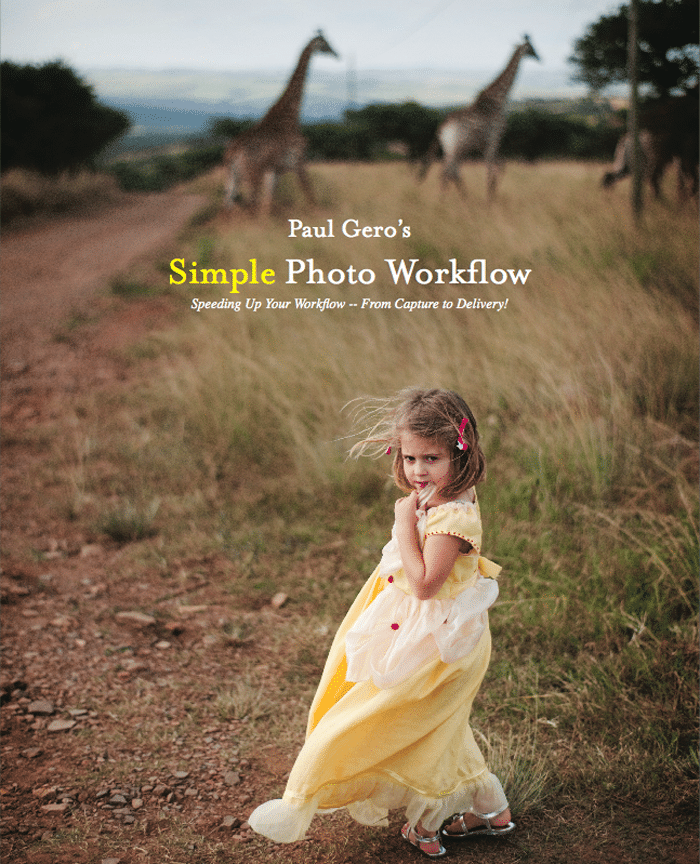
Fortunately, I am not alone in this line of thinking. Paul Gero, a friend and fellow photographer based in Orange County, California has published a lucid, step-by-step guide for a vast majority of photographers who have no clue about post production or who are frazzled by all the tools and options presented to them. The guide book is called Simple Photo Workflow.

Paul Gero's Simple Photo Workflow

With over 20 years of experience as a photographer – first at newspapers and then documenting weddings and portraits – Gero is one photographer whose words and work I trust. You may recall his excellent guest blog post on Tiffinbox – Control & Chaos: Two Genres of Photography.

Now, go on check his blog out. It's a source of weekly inspiration for me. Set aside for a moment the way Gero expresses the light and life he sees in front of him. I think he is a master at photographing the unguarded moment. However, take another look at the way the images are processed.

To my eyes, there is nothing complicated about them, yet they are brilliant. I see natural skin tones, just the right amount of grain, light vignetting that draws your eyes to the main subject of the frame and the black & white images that have both depth and drama to them. With Photoshop and other image processing tools, it's much too easy to go crazy and drop layer after layer of actions, until your vision of the final image is not only blurred, it's obliterated.

Getting back to saving time, the post production work Gero introduces us to in his new e-book, is simple, yet elegant. It won't stress you or your computer out. Gero expresses his thoughts simply as well. Chapters on exposure, editing, raw processing, using Lightroom and photo finishing (retouching) are all punctuated with exceptional examples and step-by-step instructions, so you'll never falter. As a bonus, Gero has a “cheat-sheet” at the end of the book that walks you through all of the processes he goes through when he is editing his own images! This is like looking over his shoulder and watching him work, except you'll be doing it yourself and learning from it.

If you already use Photomechanic, Lightroom and Photoshop and use them well, then this ebook isn't for you. However, if you do use these programs in your post-production work and you are just stumbling along, I urge you to . Yes, I called it an ebook before, but it's much more than that. You'll want to print it out (as I have) and use it as you edit your images. Once your post production become intuitive, then you can go in and customize the system.

Full disclosure – I received a complimentary copy of the ebook to review but I am not an affiliate and I do not make a dime off of the sale of this wonderful book. I am recommending it here solely on its merit.

Want your own copy? Use “seshu” between today and August 29 to buy it for $47 (regular price is $77). I am sure you want to save $30.

Filed Under: Photography Workflow Tagged With: adobe photoshop, adobe photoshop lightroom, computer graphics, graphics software, guide books, images, keep it simple, orange county, paul gero, photo manipulation, photographer, Photography, process imaging, simple photos, vignetting, Workflow

Love The Products & Services Posted On Tiffinbox?

April 11, 2011 by Seshu | Editor & Publisher

Blogs began as personal journals – ones that were kept private or open to the world. Now they are so much more than diaries. They are a way of communicating with your clients. Call it “marketing” if you will, but it works. If you are in need of learning something specific, there is likely a blog that covers that niche.

Photography is no different, though there are tons of photography blogs out there, including this one. What I've envisioned, of course, is to make this site truly community driven. That means hosting guest bloggers, entertaining opposing viewpoints in the comments section and being open to suggestions on making this site better for everyone.

To an extent, I have to be careful about what I publish and even promote. I am contacted virtually every week by a vendor looking to have her or his products and services mentioned here. And I am happy to promote them if (and it's a big IF) the products and services are truly helpful for other photographers.

There are times when I am sent review copies of magazines, books, scripts and Photoshop actions. Obviously, once these are sent to me, I get to keep them. If I am sent camera equipment to test, I do have to return those of course. While I am open to receiving these gifts and opportunities to review items, I am clear on one thing – if the items do not meet my standards or aren't going to be very helpful for other photographers – I reserve the right to not mention it here. Does that sound fair to you? There is little or no point in berating a product or service in public when we all know that we are all just trying to make a go of it. I do and have in the past emailed the vendor privately with my thoughts. So, please be sure that I do act as a filter, for your benefit.

The blog post about creating blog montages was clearly helpful to Richard Esposito, a Connecticut-based wedding photographer. Read his testimonial below:

“Thank you for the suggestion with using Storyboard! I used to do these collage type blogs in the past and it was way too time consuming. I just gave up. I write actions like this all the time, but I didn't have the time to even think this up. The Storyboard script for Photoshop is beyond just an action with all it's options. I purchased it and it will now be a big part of my blogging workflow. As you know, I'm a bit of a workflow junkie. Thank you Seshu and Storyboard! I'm loving the Tiffinbox blog.”

Or, this one by Stacey Doyle on Twitter just today:

I am loving @brandcampblog's Circus Circus to help me with my writing! Thank you @PicSeshu for your review! http://bit.ly/ewlClz

So, here is my question to you – Do you love the products and services mentioned here on Tiffinbox?

Was it an e-book like Ed Verosky's series on Taking Portraiture To The Next Level or Stuart Little's recent tutorial on creating rounded corners in Lightroom 3?

Tell me which blog posts you have found useful. Would you like to see more reviews, tutorials, or both? Email me at seshu at tiffinbox dot org. I look forward to hearing from you all. If you have suggestions on products and services that you feel photographers would find useful, please contact me as well. I am always open to learning about what is out there.

Filed Under: Blogging Tagged With: adobe photoshop, adobe photoshop lightroom, computing, graphics software, love, mentions, opposing viewpoints, photographer, Photographers, photoshop action, product, product service, products, services, suggestions, useful

Creating a Tilt ‘n Shift Effect with Lightroom 3

March 1, 2011 by Stuart Little

Stuart Little, is a Photographer, Writer, Blogger and Photoshop Educator with over 18 years experience in the field. Stuart has been teaching both Amateur & Professional Photographers since 1998 and he is based in the Scottish Coastal Town of Ayr in the West of Scotland. Visit Stuart’s website http://www.alittlephotoshop.com. Read his first post about creating rounded corners in Lightroom 3.

Thanks once again to Seshu for inviting me to create another LIghtroom video tutorial for your viewing pleasure. Today I am going to show you how to fake a Tilt n Shift lens effect directly within LIghtroom 3. Now I am not going to bore you with the history of this very popular style of image processing but needless to say there are 3 ways you go do this effect.

1. In Camera
2. In Photoshop
3. In Lightroom – Which is the way we are going to do it today.

There are two main reasons for doing this effect in Lightroom and Photoshop. 1) Shallow Depth of Field and 2) If you have an image taken from a high vantage point, then you can make it look like a miniature model partly because of the shallow depth of field blur and partly because of the subject and angle of the image.

In this video tutorial I show you how to create the effect from a shallow depth of field point of view which is how I mainly use the technique in Lightroom. If you want to go down the faking a miniature model look, then in my view you are better doing it in Photoshop. I have that very video tutorial over at alittlephotoshop.com if thats of interest to you.

Learn more about Tilt Shift Photography.

If you have examples of tilt ‘n shift work, please share them as links in the comments section. We'd love to see how you have used Stuart Little's technique, or your own.

Filed Under: Photo Technology, Photography Tagged With: adobe photoshop, adobe photoshop lightroom, application software, computing, creating a, depth of field, effect, effects, graphics software, lightroom, perspective control lens, photographic lens, photoshop, photoshop educator, professional photographers, science of photography, shift, shift lens, stuart, stuart little, tilt, tilt shift photography, video tutorials

Creating Round Borders In Lightroom 3

February 15, 2011 by Stuart Little

Stuart Little, our next guest blogger, is a Photographer, Writer, Blogger and Photoshop Educator with over 18 years experience in the field. Stuart has been teaching both Amateur & Professional Photographers since 1998 and he is based in the Scottish Coastal Town of Ayr in the West of Scotland. Visit Stuart's website http://www.alittlephotoshop.com.

Thanks to Seshu for giving me the opportunity to share with you a really cool and utterly simple technique for creating a rounded border from within Lightroom 3.

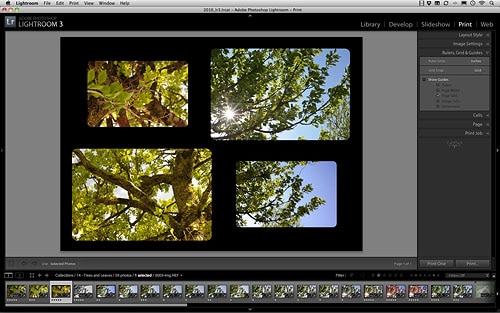
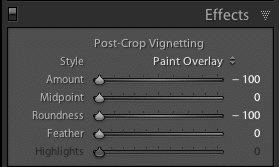
When Adobe brought out Lightroom 3 they added 2 new features to the post crop vignette that made creating vignettes even better than before. So much so that the older paint overlay style has kind of been forgotten until now.

Lightroom Effects Panel SettingsYou can watch the video for all the juicy know-how but for those of you who just want to get stuck in via your RSS reader then slide all the post-crop vignetting sliders to the left for a black rounded border, job done, nuff said. Yep! its that simple But here is the another cool thing. If you want a white border then just take the amount slider all the way to the right.

Rounded Corners In Lightroom 3

Best thing of all. You can save the whole lot as a simple preset so that one click will take care of it all in future. Fire up the print module and set the background colour to compliment the border colour. Make sure you are using custom layout and then you can drag n drop the round images directly onto a layout ready for printing. Although if you are going down the inkjet route I would go for a white border and save yourself some ink. Enjoy the video tutorial and dont forget to swing but alittlephotoshop.com for more Lightroom 3 training and free workflow actions for Photoshop.

Stuart has offered to send me another blog post, this time about creating a tilt-n-shift effect in Lightroom 3. Here's the deal, though, for that to happen I need to see at least 20 comments from you. Ask questions or suggest an alternative way of creating round corners. But I do need to hear from you. So, will you chime in? If you liked this post by Stuart, I think you will enjoy the next one too.

Filed Under: Photography, Tutorials, Web/Tech Tagged With: adobe photoshop, adobe photoshop lightroom, adobe systems, application software, blogger, bloggers, borders, computing, creating, graphics software, inkjet printer, lightroom, photoshop, photoshop educator, professional photographers, raster graphics editors, stuart little, Teaching, Video, video tutorials, vignetting

Subscribe To Tiffibox Treats!

Looking for a well-curated email newsletter that will leave you inspired and motivated about your photography business? Sign up below!

About Seshu

Seshu creates relaxed portraits of families and high school seniors in Avon, Connecticut. He also leads a successful headshot photography studio in Connecticut, helping professionals from a variety of disciplines project the very best versions of themselves. He created Tiffinbox as a way of inspiring photographers, to create better images and successful businesses. [Read More]

Email Templates For Headshot Photographers

Email Templates for Headshot Photographers

Recent Posts

  • How Capture One Changed My Event Photography
  • 10 Steps To Stay Positive In Times Of Great Stress
  • Why You Need To Read “Personal Branding For Photographers” Now
  • How To Master Your Website Content Step By Step?
  • Tony Taafe’s TNT Method For Headshot Photographers

Recent Comments

  • Stephen Davison on Are You A Business Owner Who Is Smart, But Stuck?
  • Ben A. on Don Giannatti Clinches The 8th Annual Tiffinbox Award
  • Dan on Don Giannatti Clinches The 8th Annual Tiffinbox Award
  • Donald Giannatti on Don Giannatti Clinches The 8th Annual Tiffinbox Award
  • Stephen Davison on G.E. Masana’s 6 Strategies For Wedding Photography Success
  • Naveen Kumar on Weddings In India Are More Than Being At The Right Place And At The Right Time
  • kartick on Weddings In India Are More Than Being At The Right Place And At The Right Time
  • Leonid Farbman on 6 Uncommon Trends To Grow Your Photography Business
  • Willow and Finch Wedding Photography on 11 Reception Tips To Help Your Wedding Photography
  • Web Designer Malaysia on How To Optimize Your Squarespace Website For Search Engines
  • Creastan on An Interview With Photojournalist G.M.B. Akash
  • Cindy Brown | Atlanta on An Open Letter To A Local Photographer

Become a Patron!

Copyright © 2026 · Tiffinbox · Site Design by Heather Mackan Creative · Built on Genesis