• Photography
  • Interviews
  • Business
  • Reviews

Tiffinbox

Inspiring Photographers

  • Home
  • About
  • Blog
  • Contact

Make Your Photos Sing (Part I)

April 13, 2010 by Guest

Phil Mackenzie avatarThis is a guest post by Phillip Mackenzie, a Pennsylvania-based wedding & portrait photographer.

When people hear that I have three degrees in music and I’m now turning to photography, they often give me a quizzical look and ask why I would make such a drastic change. I don’t think it’s all that drastic, in fact, images and music are far more intertwined in their compositions and affectations than you might think.

Imagine this.
You’re out somewhere and a song starts. The infectious beat creeps into your body and your foot starts to move involuntarily, tapping to the rhythm. Something deep and primal infects you, and when the song ends you just want to hear it again! Any music that ellicits this sort of reaction is “get up and dance” music. This is opposed to “sit down and shut up” music that tends to be more cerebral than emotional, and demands your utmost concentration and thought to understand, just like some photography.

Music is everywhere. And it dares you not to pay attention.
Music is one of the most powerful forces in existence, isn’t it? Plato thought so. For millennia, people have danced, kissed, fallen in love, cried, got angry about, even gone into battle to a soundtrack. There’s an immediate, gut-level reaction. For instance: you either love or hate bagpipes. I’ve never met anyone who was indifferent. (And if you are, I’d love to meet you!) If you love them, there’s no more rousing sound than the pipes and drums of the Royal Scots Dragoon Guard. If you detest them, you want to rip off your ears.

Images have power too.
Images can elicit the same gut-level reaction, be it positive or negative. Jill Greenburg’s series of portraits called “End Times” is provocative. Your opinion is immediate, strong, and gut-level. Has time ever escaped you as you’ve taken in an image? The same reason you can’t get a song out of your head is the same reason you can’t stop looking at a photograph. While I can’t really explain the magic “why” of everyone’s gut reaction, I can explain the “how.” When you hear a great song, you play it for your friends, tweet about it, make sure other people listen to it. When our clients see photos that sing to them, they can’t help but spread the word. All of a sudden that one photo (or more, hopefully!) can spread across the entire world like wildfire. If you create images that sing, they’ll do all the work for you. And here’s how to do it.

Break it down.
What was the last photo you saw? What do you remember? Did you feel great joy or desolation? Melancholy? A couple deeply in love with each other? Both music and photography have the ability to capture our emotions and put them into aural or visual form. They do it the same way, just using different vocabulary. Let’s look at the basic elements of music:

• Melody
• Rhythm
• Harmony
• Timbre
• Dynamic

These are the most obvious and affective elements of music, and they are all paralleled in photography. Today we’ll explore the first two, melody and harmony.

Hear the Melody, Be the Melody. (The Obvious, In-Your-Face Part)
When I mention a song to someone and they tell me that they don’t know it, I respond with “Oh, you know, the one that goes like this…” and then I hum or sing a few bars of the melody. Strictly speaking, the melody is the theme, the single most recognizable part of a piece of music. Usually it’s the first thing you recognize about a tune (sometimes it’s the rhythm, but more often than not you still can’t be sure until you hear the melody). Melodies are amazing creatures; they can carry emotion and meaning even without words. When there is a lyric, though, the melody serves as the structure by which we remember the words. Don’t believe me? Try to recite the lyric to your favorite song without thinking about the melody…it’s a challenge! It functions in the same way as the subject of your photograph. It is the most basic, in-your-face element of an image. Look at the following image for 5 seconds or so, then close your eyes and see what you recall about it.

Melody - Portrait

I’ll bet the first thing you remember is the girl’s incredibly bright and engaging smile. You might also recall the supporting color palette, and the contrast her hair color makes against the grassy background. All of those background details play a supporting role to her face, particularly the smile. This is the difference between melody and harmony. While you can distinctly remember a melody, the harmony tends to collect itself into large blocks or swaths of color or texture. While her smile may seem distinct in your memory, you may just recall the generally bright green color surrounding her without the various yellow leaves, and you’re not likely to remember the exact position of her left hand or even how curly or straight her hair might be. Melody. It’s what you remember.

Harmony: The Enabler. (The Bricks and Mortar of Music and Images)
If the melody is what you remember, the harmony is what helps you remember it. It’s what enables the melody to live and sing to our ears. It’s the rest of the Sistine Chapel ceiling that isn’t God and Adam. It’s the parts of New York City that aren’t tourist attractions. It’s the rest of the cast of a movie or a musical. In one-man shows, there’s always a supporting character even if it’s just the actor doing a different voice or personality (think Smeagol/Gollum in The Lord of the Rings), or speaking to an inanimate object like Tom Hanks did to his volleyball in Cast Away.

If I think of my favorite song, I might not be able to remember specifics about the harmony, but I can remember the “chunks.” In fact, it’s often incredibly difficult to sing a tune without hearing the harmony (either externally or in your “inner” ear). All you have to do is watch the auditions for American Idol for 5 minutes (or even 30 seconds) and you’ll hear that it’s quite difficult, and for some, impossible, to sing something without an accompaniment. Any time Randy Jackson tells them that their singing was “pitchy,” it would probably have been better with someone playing the harmony. Then again, if everyone sounded good with the harmony behind them, karaoke wouldn’t be any fun!

Think of your favorite song. Can you hum the harmony? How much about it can you remember? A melody can be made or destroyed by the harmony. In photography, the harmony could be called many things: the background, visual palette, scene, or frame to name a few. It’s the stuff in the image that’s not your subject. For a bridal portrait, the harmony might be a bright, vibrant, out-of-focus background and a bouquet.
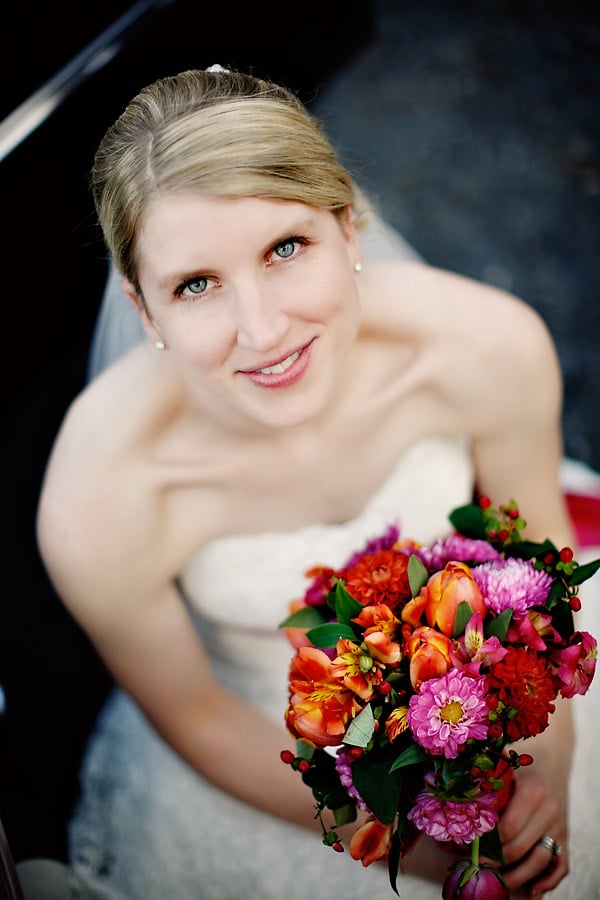
Harmony - Portrait

Getting even more specific, the subject might be so small as just a person’s eyes, and everything else, including the rest of their body, becomes secondary. A fine example is Joe McCurry’s famous “Afghan Girl” (if you don’t know it, Google it now)—her indescribably hypnotic eyes are without doubt the focal point of the image. But without the rest of the image – her clothing, the framing, the green wall in the background that oddly matches her eye color – her eyes aren’t nearly as spectacular. The melody might be her eyes, but the harmony is the rest of the image. Nothing in that photograph is unimportant. Every element is there as part of the melody or the harmony to support it. Her eyes sing in that photograph and draw you in to see more.

Stay Tuned.
In Part II, we’ll look at the other elements and how all of them work in collaboration to produce a truly memorable song or spectacular image.

Filed Under: Art, Music, Photography Tagged With: Art, Music, Photography

Dramatic Portrait Lighting For Photographers

April 8, 2010 by Seshu | Editor & Publisher

Zach Ancell, photographerThis is a guest post by Zach Ancell. Please stop by his site to see more of his images, www.zachancell.com, and visit my blog, www.zachancellblog.com, if you want to pick up on some more of his tricks. They are both very new sites so he's in the process of getting a bunch of content up (mainly more tutorials and info on his blog). If you keep checking back, you’ll see new tutorials and information that I think will help you all become better photographers. You can also email him at zach@zachancell.com if you have any further questions.

Photography is translated from the Greek roots phos (light) and graphis (paintbrush). I’m sure it comes as no surprise to any of you that the word photography means painting with light (I’m sure you’ve all heard this a million times). Well, this means not matter what type of photographer you are, when you pick up your camera, you’re using some sort of light.

Light can come from various sources such as the sun, strobes and speedlights. Ambient light is one of the more natural ways to light a subject but you can have so much more fun when playing around with “artificial” lighting. In my mind, light is light no matter what the source is so that’s the last time you’ll hear me refer to it as “artificial.”

For many photographers, strobes and speedlights can be one of the most intimidating factors to incorporate into your photography. Okay, well maybe I’m making some grand assumption but at least that’s how it was for me. I started out trying to do everything possible to avoid using strobes. Lighting a subject was something so foreign and different to me that I felt like it would be impossible to comprehend.

But, up to this point, I’ve learned one simple thing about photography. You’ll never create anything extraordinary if you don’t experiment and try new things. I am by no means trying to get you believe that I’m a master of lighting, I just know how I light my subjects the way that I do and that’s what I’m here to teach you.

For the most part, I stick with two basic lighting approaches: a single strobe approach and a triple strobe approach. Each approach involves using Nikon Speedlights (but any speedlights will work as well as studio strobes) and various light modifiers. Don’t worry, it’s nothing complex and I’ll walk you through the steps and give you an example of a photo I’ve shot using one of these two techniques.

Single Strobe (Beauty Dish)

One Light Setup

This is one of the simplest lighting setups but creates beautifully dramatic images. As you can tell from the diagram above, you are using a beauty dish for your light modifier. This can be easily mimicked with an octobox or a softbox but the only difference with a softbox is you won’t get the circular catch lights in the subject’s eyes.

You want to place the beauty dish a little above the subject’s head pointing down and only about 2 or 3 feet away. Basically, put your light modifier as close to the subject as you can without it imposing on your image.

This will give you that nice lighting that wraps around under the nose and trials off towards the bottom and top of the image. You want the center of the dish/softbox/octobox pointing directly to the center of your subjects face (their nose).

As far as power levels go, play around with it. I usually shoot at around f/8 and at a shutter speed of 125 to 250 (pushing the boundary of the max sync speed of most cameras and pocketwizards). I don’t worry about a light meter because I know how I want my image to look.

To keep the image dark and dramatic, don’t dial up your power too much. You want to keep it low and just enough to light up the face (but not to the extent you would for a beauty shot). Being a photographer is about being artistic and creative so have some fun with it. If I told you there were an exact shutter speed, aperture, ISO and flash power to get exactly this shot, there would be no creativity involved.

This is the most simple lighting I use and I use it instead of my three light if I need the subject to put their hands up, or have something covering the sides of their face (this will make more sense in a moment).

This one light setup will give you lighting like this:

One Light Portrait

This isn’t straight out of the camera but you can see where the light has fallen and how it tapers off away from the center (his nose).

From there, with a little composite work, you can achieve a look like this:

One Light Setup Composite

* This setup you can also shoot from underneath the beauty dish to get a head-on shot of your subject. *

Triple Strobe (Two Softboxes and a Beauty Dish)

Three Light Setup

This is the lighting style that Joel Grimes uses in a ton of his work and I actually got a chance to go to his workshop and learn a lot more about how it’s done.

As the title implies, this setup involves using three lights. I use 4 SB-600’s and a SB-800 to do this. I pair up my SB-600’s to get a little more power and shoot through two Lastolite Ezyboxes. Then, I use a SB-800 and shot into my beauty dish (like I do for my one light setup).

You want to place the two softboxes equal distance apart from the subject but the distance is dependent upon what you want to happen. The further away form the subject they are, the harsher the light is going to be. There’s nothing wrong with harsh light (I love it in fact) but be aware that you need enough power to make this happen. The closer the lights, the softer the light will be. Think about your subject and decide what type of lighting best works for them. I work with a lot of athletes and that requires a more harsh light but when working with a model, I want the light a lot softer. Position the beauty dish overhead like in the previous setup but pull it back so it’s about 6 to 10 feet away from the subject.

Now that we’ve got the placement down, now we have to worry about the power. Like I mentioned in the one-light, I like to shoot at f/8 or somewhere around there. KEEP THAT CONSTANT. Pick the aperture you want to shoot at and stick with it. From there, you can play around with the shutter speed (once again, I’m usually around 125 to 250) and then you can worry about your lights.

My two softboxes I always shoot at full power when using speedlights (1/2 power on each flash and since I pair them up that’s full power). If you are working with studio strobes, Joel recommends shooting it overexposed by a stop and then the beauty dish at a stop underexposed. Worry about your sidelights first and once you have those lighting the subject the way you want, you can work on your beauty dish. You want the beauty dish to light the subject up a bit but don’t overpower the sidelights. If you do, you’ll ruin the drama of the image.

One HUGE thing to be aware of is the fact that any props, hoods, arms or hands to the side of the subjects face will cast shadows and ruin this look. But, as I have done many times, you can shift the lights forward a little to avoid this mishap. Once again, it’s about playing around with the lights and having fun with the creative process.

This lighting setup can give you an image like this:

Three Light Setup Example

This is another one that’s not straight out of the camera but you can see where the light is coming from and where it is hitting the subject. The key to this is creating those harsh transitions from where he is lit to where he isn’t. You want to emphasize the shadows and create a very contrasty image.

In this image, look at the subjects face. You can see the harsh transition from the highlights on the side of his face to the dark shadows in the middle. That’s a result of pulling those sidelights further away and creating the harsh light. For a model, pull those lights in and you’ll see the transition become smoother.

Wrap Up

My biggest advice for all of you is to take your camera, your flash equipment and a friend, and go try these setups out. Try the three-light with the sidelights far and close to the subject. See what the difference looks like and know what to look for when you are actually on a shoot. Play around with the one light and shoot from underneath the beauty dish, above and to the sides. Photography is all about the creative process and playing around.

I hope this has helped some of you gain a better understanding of the lighting setups I use to create the images that I do. Like I mentioned at the start, these images are all about the lighting. The post processing doesn’t work on images that don’t have the highlights and shadows. So although I haven’t given you everything you need to create images like these, you are well on your way.

It’s an honor and a great opportunity to share what I know to other photographers. I learned photography by reading online about how other photographers do what they do and now I hope I can help out others.

Please do share your comments below!

Filed Under: Lighting, Photography, Strobist

Ethics & Etiquette For A Second Photographer

April 7, 2010 by Doug Levy

Doug Levy is a Sharon, Massachusetts photographer and former professional baseball umpire. You can see his wedding photography at douglaslevyphotography.com, and his portraits at douglaslevy.com. He also blogs at dougblogs.com and spends way too much time with his Blackberry updating those sites.

With the wedding season quickly approaching, Seshu and I thought it might be helpful to put together a blog post of suggestions that might help second shooters this summer.
 
Since I first assisted Rob Brown at my first wedding in the fall of 2007 I've assisted and second shot for nearly a dozen Boston-area photographers. Some have been amazing, inspiring learning experiences. Some, well, I'll just leave it at I've only worked with them once.
 
Second shooter Do's and Don'ts
 
If I could give you one bit of advice, I'd just say, “be cool.” It really should be that simple. Wedding days are long, and when I'm the lead photographer I'll hire someone I want to hang out with who takes OK photos before someone who takes amazing photos but is a pain in the ass and I have to baby-sit all day.
 
A little more practical advice (what, “be cool” wasn't clear enough?)
 
Dress appropriately

Rob prefers me to wear a tie when I shoot with him. I don't wear one for my weddings, but I certainly don't mind wearing one for Rob's – remember, you are a representative of the lead photographer's brand and business, if you show up in unshaven in cut-off's, it's the lead photog's brand you've just damaged.
 
Treat Clients As Your Own

As an extension of that brand, it's important to treat the client as though they are your own. If possible get some information from the lead photographer about the couple beforehand. How does the couple envision their day? Is photography the most important element or just one part of a much bigger plan? Are there any family issues you need to be aware of? Is it OK to use flash during the ceremony? Are there any explicit do's and don't during the ceremony (many venues are specific “Don't stand here, no moving once the ceremony has started etc..”

But, Your Business Is No One's Business

Don't sell yourself to the client or their guests. This is probably the number one no-no. This should be painfully obvious, but don't pass out your business cards either (unfortunately I've heard of this happening). It might even be a good idea to ask the primary photographer for some of their cards, that way if guests asks you can have them at the ready.

Wedding Rings By Doug Levy
 Experiment With The Gear

From a technical standpoint, second shooting can be a great opportunity to use some gear you don't own (especially if you both use the same brand), but, and this should be obvious, it's not a good idea to go rooting around in another photographer's bag without permission.
 
Commit To Making Great Images

Be fully committed to the photos, not just your photos. I've probably missed dozens of portfolio quality moments while second shooting. But the thing is, it doesn't matter. This may be the most important thing I say here – it's not your show.
 
This means that there will be times during the day when you have to give up “your” picture because time is tight, or the primary photographer has a different vision, but that's OK. There will be times when have to fall-back into the role of an assistant. Usually this is during the family formals, when time is tight, or during couples portraits when additional lighting may be necessary.
 
Sweet Embrace by Doug Levy
The Experience Of Being Photographed Counts

The important thing to remember is while good primary photogs will want to hear your ideas, as my friend Ned Jackson has said numerous times, giving the clients a great experience is just as important as giving them great photos. If formals run 30-minutes long and the couple misses cocktail hour because of the photographers, they'll remember that, no matter how great the photos are.
 
(A quick aside: After I attended one of my best friends' wedding as a guest this fall I was at his apartment a few months later looking at their proofs, and while the photos were amazing (and the couple loved them), they also remembered by the end of the couples portraits, “We were totally exhausted and sick of photos.” I never want my clients to reach that point of exhaustion.)
 
Don't Just Shadow The Primary Photographer

Don't simply make your version of the lead photographer's photo. I think we've all seen this happen, there's great light, a great moment, and you obviously both want to capture it. The thing is, it's not your show, so it does the lead photographer no good to have two versions of the same image. So, don't stand next to the lead photographer and shoot with the same lens.
 
Take Risks

One of the best parts of second shooting is the ability to take risks. If the lead photog is making the “safe” image, it's your job to find the “hero” image. (Some lead photogs prefer to work the opposite of this. I know Joe Buissink hires a second photographer to take the safe shots all day so he is free to roam. This goes back to why it's important to game-plan the day before).
 
That said, I know if the lead photographer is shooting long, I'll shoot wide. If they're shooting available light, I'll crank up the flash. The best second photographers will give an entirely unique perspective to the day, without being intrusive.

Filled With Joy by Doug Levy
Don't overshoot

No one wants to go through 3,000 images with minute variations. Get the shot, then look for the next one.
 
This Is Not A Workshop

Don't forget this is not a workshop. One of the best parts of second shooting is the window into someone else's creative process. Literally no one I've shot with does things the same way, from formals to how they approach the ceremony. So while it's important to not be afraid to ask questions, make sure you pick the right time. Generally this will be in the car in between locations or toward the end of the reception once things have slowed down a bit.
 
Publish & Perish
 
After the wedding day, don't blog/publish the photos before the primary photographer does. And when you do blog the photos (and make sure the other photog is OK with it), don't try to play the wedding off as your own. Make it clear you were the second photographer and link to the main photographer's site/blog post in your own post.

Childs Play by Doug Levy
 Advice for the main photographer:
 
Don't expect the second photographer to edit their images for free.

If you want me to edit my take, I'm happy to, but should be compensated. (I'm talking about a full edit here, color correction, culling etc.)

Don't ask me to sign a work-for-hire-agreement.

This type of agreement typically states that any images made for the primary photographer's studio become the copyright of that studio. Many second photographer are new shooters with minimal portfolios. When I first started, the only images in my portfolio were from second shooting, don't take that away from me.

Don't show the second photographer's photos as your own.

I had a friend recently call me after second shooting for the first time for a more experienced photographer. A few weeks after the wedding she was on his website and saw some of her photos from the day in his portfolio. While it's expected that my photos will end up in the client's gallery from the day, don't show them on your site as your own.

Don't ask the second photographer to put your logo on their photos.

I know this may sound a bit funny, but when I was first starting out (and didn't have much of a portfolio) one photographer asked me to put her logo on photos I shot while working for her. Photos that were on my website. I'm still scratching my head about this one …
 
I'm sure I've forgotten some things, but I hope this helps some people going forward this season. If you have any questions, please don't hesitate to e-mail me at doug@douglaslevyphotography.com

Filed Under: Commentary, Photography, Weddings

Is Your Photography Business Booked Solid?

February 3, 2010 by Seshu | Editor & Publisher

As a documentary wedding photographer, each November as the wedding season in the US winds down, my thoughts swing to the next season and whether I will meet my target of 25 weddings per year.

One of the best books ever written about being booked solid is by Michael Port, called Book Yourself Solid. I recall reading it cover to cover, taking notes along the way and paying attention to the steps Michael outlines to have a thriving business. In addition to being an author, Michael is a speaker and educator.

So, when Michael speaks or emails me something, I sit up and take notice. A recent note from him introduced me to his new Booked Solid University. It's his “entire lead generating, client producing, business building, book writing, product creation, book yourself solid (and beyond) systems and programs” as a business coaching program online.

I signed up as an affiliate because I feel his message, his methodology and his means are all sync with how I would like to learn about creating, sustaining and elevating my photography business in Connecticut. And I bet you will enjoy his course as well.

Please come back here and let me know what you think about the course in the comments section. Your feedback is always valuable not only to me but to others who may be reading this blog regularly as well. Thank you!

Filed Under: Business, Photography Tagged With: Booked Solid, Michael Port, Photography, Photography Business, Weddings

The Emerging Photographer, by Rick Wenner

January 18, 2010 by Seshu | Editor & Publisher

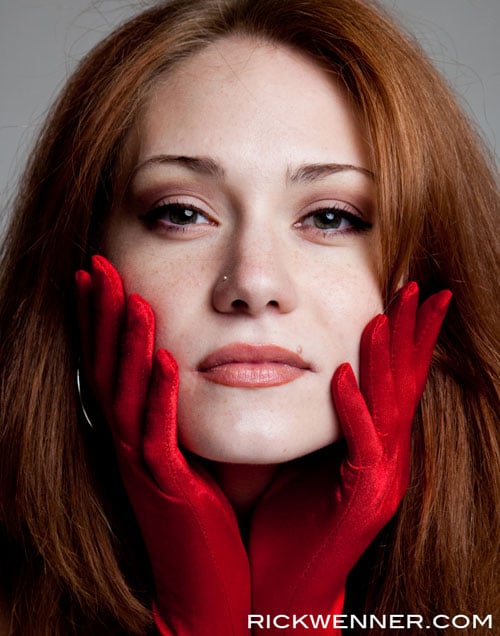
In 1999 Rick Wenner purchased his first digital SLR, a Canon 20D. After 6 years of shooting as a hobbyist, creating mainly landscapes and abstract images, he found that creating portraits was what he wanted for a career. Since that time Rick has been developing his skills as a photographer while continuing to work as a graphic designer. His future plans are to soon leave his graphic design job and go full time with his true creative passion in photography. Rick is specializing his work in entertainment and portrait photography on Long Island, NY.

Read his blog. This is his first guest blog post on Tiffinbox. Please be sure to comment below after you have read his article. Thank you!

Rick Wenner Portrait

How do I make the career change to become a full time photographer? Where do I start? Who do I work with and how do I get in touch with them? How much do I charge? Do I need a studio? What do I do?

These are some (definitely not all) of the questions I’ve asked myself in the past few years. I am currently a full time graphic designer who wants … no … who NEEDS to make a career change to what I really love, photography.

This used to be just a hobby to me 10 years ago. Every now and then I’d go out with camera in hand and create a few landscapes and abstract images, process the crap out of them in Photoshop and post it on Facebook and Myspace. Then I started photographing people and loved the connections I was making with my subjects.

After a few years I had two photos on display in a museum in the Hamptons. Got an editorial job from that exhibit. From that point on I knew that this is what I need to be doing with my life. Since then I’ve been working hard to make it happen and am FINALLY seeing some results from my efforts. More and more people are noticing my work and I’m getting meetings with potential clients and agencies. I know that there is still a lot more work to be done before I can drop the design gig and go full time with my photography though. It’s worth it.

So, how do I go about dropping graphic design and moving ahead with photography? I get inspired. I recently attended workshops that Zack Arias hosts (Photo 101 and OneLight) and left with my brain in a frenzy. Not only did I learn technical aspects of lighting, composition, gear, and business, I also had a fire lit under my ass that has got me heading in the right direction. Since Zack has been working with the same kind of clients that I would like to eventually be working with, I took his advice and ran with it as hard as I could.

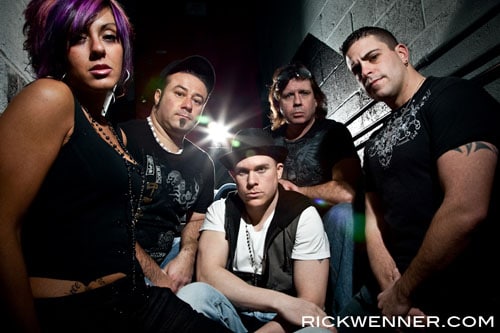
Rick Wenner Band Portrait

People need to know that you are a photographer. They won’t have a clue of what you do if you’re just sitting in front of a computer reading blogs all day. Get in front of the people you want to be working with, show them what you do and build a relationship with them. If you want to be working with musicians, go to their shows. You’ll see that even the small “no name” bands are selling T-shirts, stickers, and CD’s. So, obviously they are willing to invest in themselves.

People won’t know who you are and what you do unless you put it in front of their faces. Use social media to get your work seen by friends and family. When you are creating high quality photos, people will talk about you when someone asks if they know a good photographer. Word-of-mouth is the best advertising for your photography business. The kind of work that I want is in the entertainment industry. Musicians, bands, actors, etc. I have always loved the portraits that I’ve seen by photographers such as Mark Seliger, Platon, Nigel Parry and David LaChapelle.

So, how do I create images that will one day be seen in the big magazines that are read by thousands? Practice, practice, practice and keep practicing. Ask any pro the same question and they’ll tell you the same. Photography is a learned skill with many aspects that need to be mastered. You can read hundreds of blogs, tutorials and magazines about photography but you won’t really learn a single thing without that camera in your hand. It’s great to get tips and tricks from all those resources but you’re not going to get better at creating images by sitting in front of a computer. When you’re done reading this blog post, go take a few pictures of something … anything! You are not gaining experience by reading what I have to say.

If this is what you really love, then go after it and don’t give up. You will make mistakes. Tons of them. But you will learn from those mistakes and become a better photographer from them. Go to workshops and learn from the masters of our craft. Read David duChemin's book, VisionMongers, and if you're not inspired by that book, then this probably isn't for you.

My advice: Step away from the blogs and pick up that camera!

Filed Under: Photography Tagged With: Business, Emerging Photographer, Music Photography, Photography

  • « Previous Page
  • 1
  • …
  • 100
  • 101
  • 102
  • 103
  • 104
  • …
  • 164
  • Next Page »

Subscribe To Tiffibox Treats!

Looking for a well-curated email newsletter that will leave you inspired and motivated about your photography business? Sign up below!

About Seshu

Seshu creates relaxed portraits of families and high school seniors in Avon, Connecticut. He also leads a successful headshot photography studio in Connecticut, helping professionals from a variety of disciplines project the very best versions of themselves. He created Tiffinbox as a way of inspiring photographers, to create better images and successful businesses. [Read More]

Email Templates For Headshot Photographers

Email Templates for Headshot Photographers

Recent Posts

  • How Capture One Changed My Event Photography
  • 10 Steps To Stay Positive In Times Of Great Stress
  • Why You Need To Read “Personal Branding For Photographers” Now
  • How To Master Your Website Content Step By Step?
  • Tony Taafe’s TNT Method For Headshot Photographers

Recent Comments

  • Stephen Davison on Are You A Business Owner Who Is Smart, But Stuck?
  • Ben A. on Don Giannatti Clinches The 8th Annual Tiffinbox Award
  • Dan on Don Giannatti Clinches The 8th Annual Tiffinbox Award
  • Donald Giannatti on Don Giannatti Clinches The 8th Annual Tiffinbox Award
  • Stephen Davison on G.E. Masana’s 6 Strategies For Wedding Photography Success
  • Naveen Kumar on Weddings In India Are More Than Being At The Right Place And At The Right Time
  • kartick on Weddings In India Are More Than Being At The Right Place And At The Right Time
  • Leonid Farbman on 6 Uncommon Trends To Grow Your Photography Business
  • Willow and Finch Wedding Photography on 11 Reception Tips To Help Your Wedding Photography
  • Web Designer Malaysia on How To Optimize Your Squarespace Website For Search Engines
  • Creastan on An Interview With Photojournalist G.M.B. Akash
  • Cindy Brown | Atlanta on An Open Letter To A Local Photographer

Become a Patron!

Copyright © 2026 · Tiffinbox · Site Design by Heather Mackan Creative · Built on Genesis