• Photography
  • Interviews
  • Business
  • Reviews

Tiffinbox

Inspiring Photographers

  • Home
  • About
  • Blog
  • Contact

Forays In Photographing Underwater

May 20, 2010 by Guest

Elena Hernandez AvatarThis is a guest blog by photographer Elena Hernandez from Dallas, Texas. As a professional photographer for the past 30 years, Elena has been through various evolutions in fine tuning her craft. In the beginning, her passion was in the purity of photojournalism and worked as a freelance photographer for several local newspapers for a few years. Evolving into commercial work then transitioning into school and wedding photography. Her journey has led her into seeking out the new ways to stay creative and bring her clients into the evolution of her vision and art. Elena has won various awards such as the Fuji Masterpiece Awards to Kodak Gallery Awards. She earned her Masters of Photography degree, Craftsmen and Certification degrees from Professional Photographers of America. She is one of only a a handful of Latin women to have those degrees. I am extremely honored to have her pen some thoughts about underwater photography.

“Look and think before opening the shutter. The heart and mind are the true lens of the camera” – Yousuf Karsh

What causes a person to be inspired to go beyond what is normal into the extraordinary? For some, it is Love. For some, it is Boredom. Others might find it is because they are in a situation that demands change. I found myself one day needing a change. I needed to go beyond my comfort zone and do something totally foreign to me. I needed to take a leap into my art and do a ”free fall” of sorts. I know it is scary to venture out into the unknown. Yet, it is also exciting …

“What if I tried to shoot an underwater portrait session? What would I do to go about making that happen?”

One night, in 1999, I was having a drink with a friend named Rex, and we were discussing “what if's”… What is the one thing in photography that I have not done that I would like to? I mentioned that I attended a PPA convention one year, and met Gigi Clark and she had done some lovely underwater images of brides that reminded me of a book I had called “Pool Light”. By an incredible photographer by the name of Howard Schatz. It was fine art fashion portraiture underwater. I mentioned I would love to be able to do that someday. Then the thought occurred to me …”What if I tried to shoot an underwater portrait session? What would I do to go about making that happen?”

So began my quest to do something different and unique that was challenging and very VERY out of my comfort zone. Just so you know, there is nothing new in photography that has not been done before when photography was in it's infancy. Before Howard Schatz tried to photograph models underwater, there was a woman photographer by the name of Toni Frissell who was a society/fashion photographer in the 1920's who shot for Vogue and the New yorker. Her images were very glamorous and one in particular that really excited me was shot in Florida, underwater of a model for a fashion shoot. If you get a chance, look up Toni Frissell. Here is the image below:
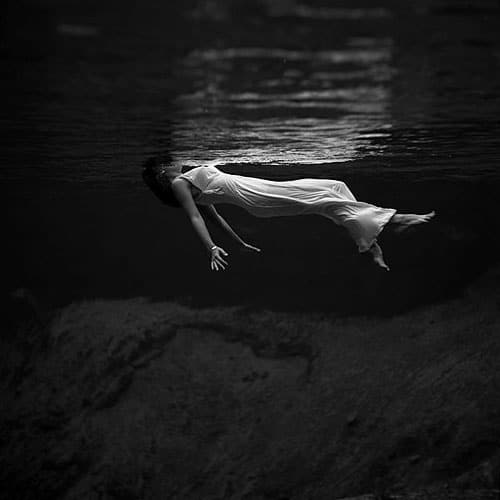
Tony Frissell - Images of model underwater in Florida

Keep in mind, this is before they invented cool underwater housings and cameras. She probably shot this inside of a float-able fish tank and probably shot this with herself being underwater and the camera inside that fish tank contraption just barely below the surface. There is no real data about how or with what this is done with, but just looking at this image made me try to figure out those questions.

As luck would have it, I had a woman ask me to photograph her nude indoors then outdoors. She just got some new ‘upgrades' if you know what I mean. I then asked her if it would be possible to do an experimental underwater session at the end of the session and that if she did not like those images she did not have to purchase them. She agreed.

Now I was committed to a project I knew nothing about. Zilch. Nada. Zero.

I figured that I would ask a fellow photographer friend, if I could borrow his underwater Nikonos camera to play around with. He said “Sure, but it has not been used in years and I think the O ring is leaking”… I said to myself: “Hmm what is an O ring?” I later found out that it is a rubber piece that keeps the camera from flooding with water …(we'll get to how I found that out later.)

I wanted to test the camera out so I bought some 35 mm film and went to a pool and immersed the camera underwater and shot in broad daylight.

Four things I noticed:
1) The camera underwater magnifies things.
2) I do not like the squiggly lines that happen in broad daylight.
3) Everything is off color blue.
4) This is a fixed focal length lens so there is no room to move around.

I decided to shoot at night.

I then also decided to immerse my $300 dollar black muslin into the pool to create a dynamic contrast that I felt this type of photography needed. (the chlorine bleached my lovely background. don't ruin a perfectly lovely background like I did.)

One thing I make clear is safety. We get in and out on one side and the electronics are on the other side.

Once I got the film back, I was really excited about this upcoming session because the images, even though they were kinda blue, looked really magical. The day came. We photographed indoors and then outdoors. I had to have two assistants with me as a “look out” for the outdoor session, because all of a sudden men were tromping in the woods where I was photographing this nude woman. I photographed those images very quickly. By the time we got back to the studio it was dark. It was great that I had a private pool to work in and so the nudes were not observed by anyone but my assistants and myself.
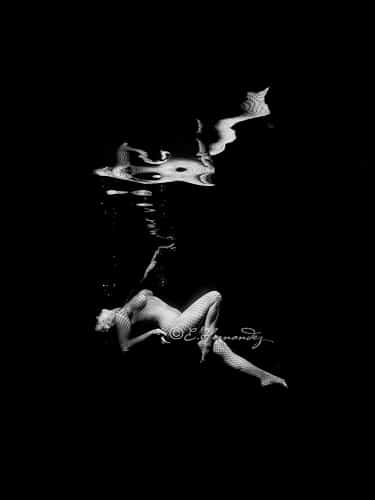
Lyrical Depth by Elena Hernandez

I lit it with 2 Photogenic lights with strip soft-boxes on the one side of the pool. I slaved the lights. I wanted a direction for the lighting and so all the electronics are on one side of the pool. One thing I make clear is safety. We get in and out on one side and the electronics are on the other side. I was halfway through the session when all of a sudden the lights were not firing. There was a short in the camera's flash system. So I went to plan B. I shot Bulb open and lifted my hand out of the water so that I could have the assistant trigger the lights manually. The problem was…when I lifted my hand out of the water it made me unbalanced and as a big girl … my butt kept floating up to the surface … (I know laugh all you want it was funny.)
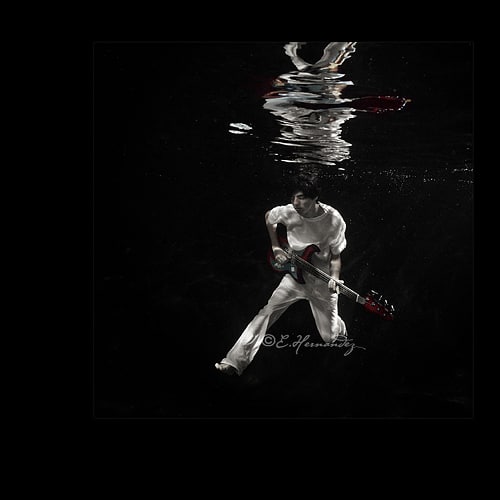
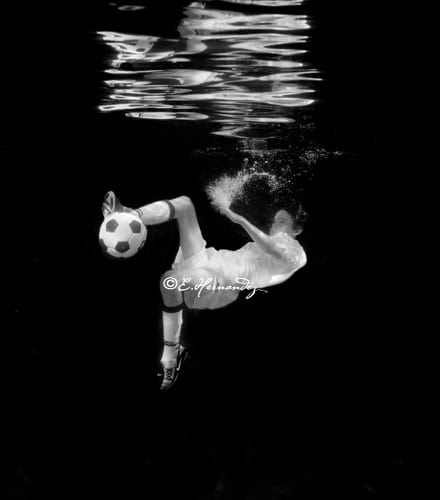
Soul Deep by Elena Hernandez

Catching Air by Elena Hernandez

My second assistant then got into the water to hold me under the surface … (lesson number two was to get a weight belt). Once I was finished with the session she went home. I tried to get the film out of the Nikonos and realized the camera was flooded slightly. (sigh … remember the O ring issue?) I immediately took the underwater roll to the lab and they processed it that night. I only lost about five images but the rest were fine. One image in particular was exceptional. I titled it “Free Fall.” It hung at PPA and was published into the showcase collection book.
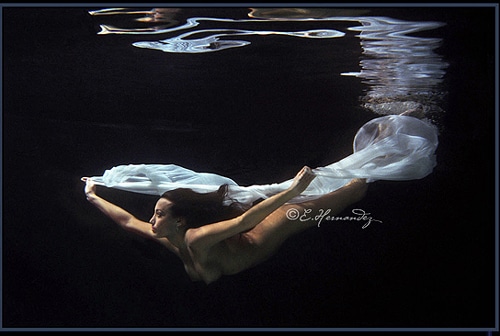
Freefall by Elena Hernandez

This was a very difficult session with all of Murphy's Laws coming into play but I am so glad I tried. I would rather try and fail than go through life saying “would have, could have, should have.”

Water Sprite by Elena Hernandez

From this one session, I started to get more people requesting underwater imagery. Then my clients started to get more creative with me in the final Art Pieces. I raised my prices for those sessions because they were so labor intensive.
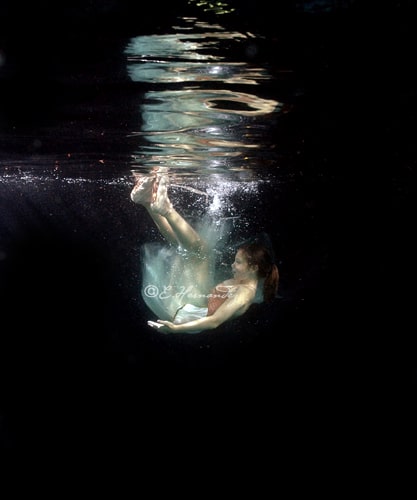
Fallen by Elena Hernandez

I also learned something important about myself and that is I am tenacious … I want to thank those pioneers who inspired me to want to be different … I hope that what ever idea or dream you might have that you do not give it up no matter what the challenges.
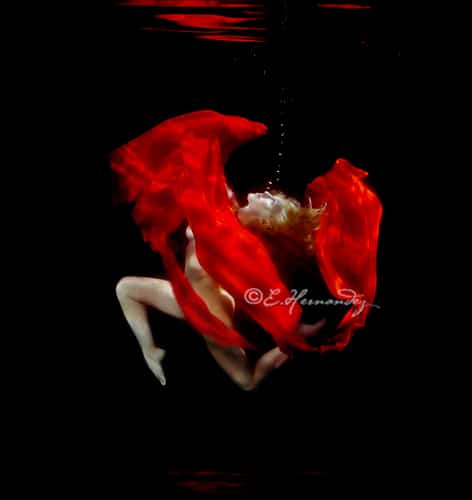
Rise Of The Phoenix by Elena Hernandez

Elena is on Twitter and Facebook. Be sure to connect with her. And you should know that she and I would greatly value your comments below. Hit her up questions about what she did and why? She may be able to give you more pointers on how to get started on photographing underwater.

Filed Under: Photography, Strobist, Visual Art Tagged With: Lighting, Nudes, Technique, Underwater Photography

Dramatic Portrait Lighting For Photographers

April 8, 2010 by Seshu | Editor & Publisher

Zach Ancell, photographerThis is a guest post by Zach Ancell. Please stop by his site to see more of his images, www.zachancell.com, and visit my blog, www.zachancellblog.com, if you want to pick up on some more of his tricks. They are both very new sites so he's in the process of getting a bunch of content up (mainly more tutorials and info on his blog). If you keep checking back, you’ll see new tutorials and information that I think will help you all become better photographers. You can also email him at zach@zachancell.com if you have any further questions.

Photography is translated from the Greek roots phos (light) and graphis (paintbrush). I’m sure it comes as no surprise to any of you that the word photography means painting with light (I’m sure you’ve all heard this a million times). Well, this means not matter what type of photographer you are, when you pick up your camera, you’re using some sort of light.

Light can come from various sources such as the sun, strobes and speedlights. Ambient light is one of the more natural ways to light a subject but you can have so much more fun when playing around with “artificial” lighting. In my mind, light is light no matter what the source is so that’s the last time you’ll hear me refer to it as “artificial.”

For many photographers, strobes and speedlights can be one of the most intimidating factors to incorporate into your photography. Okay, well maybe I’m making some grand assumption but at least that’s how it was for me. I started out trying to do everything possible to avoid using strobes. Lighting a subject was something so foreign and different to me that I felt like it would be impossible to comprehend.

But, up to this point, I’ve learned one simple thing about photography. You’ll never create anything extraordinary if you don’t experiment and try new things. I am by no means trying to get you believe that I’m a master of lighting, I just know how I light my subjects the way that I do and that’s what I’m here to teach you.

For the most part, I stick with two basic lighting approaches: a single strobe approach and a triple strobe approach. Each approach involves using Nikon Speedlights (but any speedlights will work as well as studio strobes) and various light modifiers. Don’t worry, it’s nothing complex and I’ll walk you through the steps and give you an example of a photo I’ve shot using one of these two techniques.

Single Strobe (Beauty Dish)

One Light Setup

This is one of the simplest lighting setups but creates beautifully dramatic images. As you can tell from the diagram above, you are using a beauty dish for your light modifier. This can be easily mimicked with an octobox or a softbox but the only difference with a softbox is you won’t get the circular catch lights in the subject’s eyes.

You want to place the beauty dish a little above the subject’s head pointing down and only about 2 or 3 feet away. Basically, put your light modifier as close to the subject as you can without it imposing on your image.

This will give you that nice lighting that wraps around under the nose and trials off towards the bottom and top of the image. You want the center of the dish/softbox/octobox pointing directly to the center of your subjects face (their nose).

As far as power levels go, play around with it. I usually shoot at around f/8 and at a shutter speed of 125 to 250 (pushing the boundary of the max sync speed of most cameras and pocketwizards). I don’t worry about a light meter because I know how I want my image to look.

To keep the image dark and dramatic, don’t dial up your power too much. You want to keep it low and just enough to light up the face (but not to the extent you would for a beauty shot). Being a photographer is about being artistic and creative so have some fun with it. If I told you there were an exact shutter speed, aperture, ISO and flash power to get exactly this shot, there would be no creativity involved.

This is the most simple lighting I use and I use it instead of my three light if I need the subject to put their hands up, or have something covering the sides of their face (this will make more sense in a moment).

This one light setup will give you lighting like this:

One Light Portrait

This isn’t straight out of the camera but you can see where the light has fallen and how it tapers off away from the center (his nose).

From there, with a little composite work, you can achieve a look like this:

One Light Setup Composite

* This setup you can also shoot from underneath the beauty dish to get a head-on shot of your subject. *

Triple Strobe (Two Softboxes and a Beauty Dish)

Three Light Setup

This is the lighting style that Joel Grimes uses in a ton of his work and I actually got a chance to go to his workshop and learn a lot more about how it’s done.

As the title implies, this setup involves using three lights. I use 4 SB-600’s and a SB-800 to do this. I pair up my SB-600’s to get a little more power and shoot through two Lastolite Ezyboxes. Then, I use a SB-800 and shot into my beauty dish (like I do for my one light setup).

You want to place the two softboxes equal distance apart from the subject but the distance is dependent upon what you want to happen. The further away form the subject they are, the harsher the light is going to be. There’s nothing wrong with harsh light (I love it in fact) but be aware that you need enough power to make this happen. The closer the lights, the softer the light will be. Think about your subject and decide what type of lighting best works for them. I work with a lot of athletes and that requires a more harsh light but when working with a model, I want the light a lot softer. Position the beauty dish overhead like in the previous setup but pull it back so it’s about 6 to 10 feet away from the subject.

Now that we’ve got the placement down, now we have to worry about the power. Like I mentioned in the one-light, I like to shoot at f/8 or somewhere around there. KEEP THAT CONSTANT. Pick the aperture you want to shoot at and stick with it. From there, you can play around with the shutter speed (once again, I’m usually around 125 to 250) and then you can worry about your lights.

My two softboxes I always shoot at full power when using speedlights (1/2 power on each flash and since I pair them up that’s full power). If you are working with studio strobes, Joel recommends shooting it overexposed by a stop and then the beauty dish at a stop underexposed. Worry about your sidelights first and once you have those lighting the subject the way you want, you can work on your beauty dish. You want the beauty dish to light the subject up a bit but don’t overpower the sidelights. If you do, you’ll ruin the drama of the image.

One HUGE thing to be aware of is the fact that any props, hoods, arms or hands to the side of the subjects face will cast shadows and ruin this look. But, as I have done many times, you can shift the lights forward a little to avoid this mishap. Once again, it’s about playing around with the lights and having fun with the creative process.

This lighting setup can give you an image like this:

Three Light Setup Example

This is another one that’s not straight out of the camera but you can see where the light is coming from and where it is hitting the subject. The key to this is creating those harsh transitions from where he is lit to where he isn’t. You want to emphasize the shadows and create a very contrasty image.

In this image, look at the subjects face. You can see the harsh transition from the highlights on the side of his face to the dark shadows in the middle. That’s a result of pulling those sidelights further away and creating the harsh light. For a model, pull those lights in and you’ll see the transition become smoother.

Wrap Up

My biggest advice for all of you is to take your camera, your flash equipment and a friend, and go try these setups out. Try the three-light with the sidelights far and close to the subject. See what the difference looks like and know what to look for when you are actually on a shoot. Play around with the one light and shoot from underneath the beauty dish, above and to the sides. Photography is all about the creative process and playing around.

I hope this has helped some of you gain a better understanding of the lighting setups I use to create the images that I do. Like I mentioned at the start, these images are all about the lighting. The post processing doesn’t work on images that don’t have the highlights and shadows. So although I haven’t given you everything you need to create images like these, you are well on your way.

It’s an honor and a great opportunity to share what I know to other photographers. I learned photography by reading online about how other photographers do what they do and now I hope I can help out others.

Please do share your comments below!

Filed Under: Lighting, Photography, Strobist

Subscribe To Tiffibox Treats!

Looking for a well-curated email newsletter that will leave you inspired and motivated about your photography business? Sign up below!

About Seshu

Seshu creates relaxed portraits of families and high school seniors in Avon, Connecticut. He also leads a successful headshot photography studio in Connecticut, helping professionals from a variety of disciplines project the very best versions of themselves. He created Tiffinbox as a way of inspiring photographers, to create better images and successful businesses. [Read More]

Email Templates For Headshot Photographers

Email Templates for Headshot Photographers

Recent Posts

  • How Capture One Changed My Event Photography
  • 10 Steps To Stay Positive In Times Of Great Stress
  • Why You Need To Read “Personal Branding For Photographers” Now
  • How To Master Your Website Content Step By Step?
  • Tony Taafe’s TNT Method For Headshot Photographers

Recent Comments

  • Stephen Davison on Are You A Business Owner Who Is Smart, But Stuck?
  • Ben A. on Don Giannatti Clinches The 8th Annual Tiffinbox Award
  • Dan on Don Giannatti Clinches The 8th Annual Tiffinbox Award
  • Donald Giannatti on Don Giannatti Clinches The 8th Annual Tiffinbox Award
  • Stephen Davison on G.E. Masana’s 6 Strategies For Wedding Photography Success
  • Naveen Kumar on Weddings In India Are More Than Being At The Right Place And At The Right Time
  • kartick on Weddings In India Are More Than Being At The Right Place And At The Right Time
  • Leonid Farbman on 6 Uncommon Trends To Grow Your Photography Business
  • Willow and Finch Wedding Photography on 11 Reception Tips To Help Your Wedding Photography
  • Web Designer Malaysia on How To Optimize Your Squarespace Website For Search Engines
  • Creastan on An Interview With Photojournalist G.M.B. Akash
  • Cindy Brown | Atlanta on An Open Letter To A Local Photographer

Become a Patron!

Copyright © 2026 · Tiffinbox · Site Design by Heather Mackan Creative · Built on Genesis